
For a low-ceiling condominium unit with a typical floor-to-ceiling clearance of 2.4 to 2.6 meters, the ideal lighting setup must preserve physical headroom while expanding the visual volume of the space. The best configuration is an ultra-slim LED panel light with a physical thickness of 1 to 2.5 centimeters. For general living areas, compact square panels measuring 30 by 30 centimeters or round profiles of 15 to 22 centimeters (6 to 8 inches) provide balanced, glare-free illumination without dominating the ceiling plane. Larger 60 by 60 centimeter panels are highly effective but should be reserved for open-plan zones or specific task areas to avoid an institutional, office-like aesthetic.
Standard hanging chandeliers, bulky dome lights, and deep pendant fixtures physically cut into the limited vertical space of modern high-rise homes. They cast harsh shadows, create visual clutter, and make rooms feel cramped. Flat LED panels distribute light across a wider surface area, softening shadows and drawing the eye outward rather than downward. By choosing the correct panel thickness, overall dimensions, mounting profile, and optical characteristics, you can make your condo feel significantly more spacious, open, and comfortable.
Choosing the Right Thickness and Mounting Profile
When evaluating the thickness of an LED panel light, the structural design of your condominium ceiling is the single most important factor. High-rise developments in the Philippines typically feature solid concrete slab ceilings (often referred to locally as “buhos”) or suspended gypsum board drop ceilings. Your ceiling type dictates whether you can install a recessed panel or must rely on a surface-mounted profile.
Products mentioned in this guide
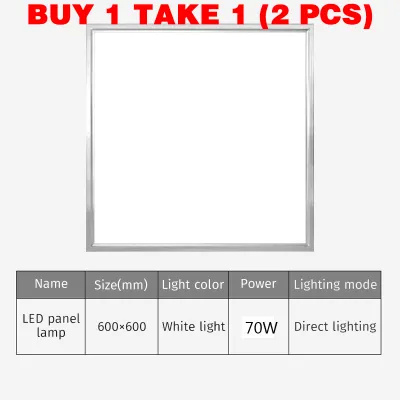
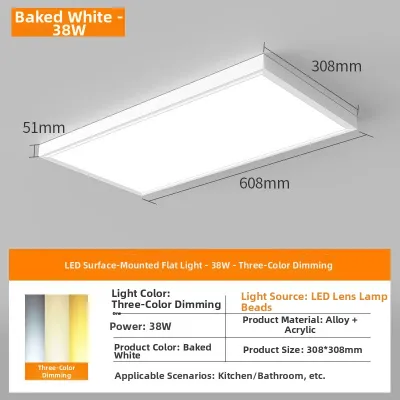
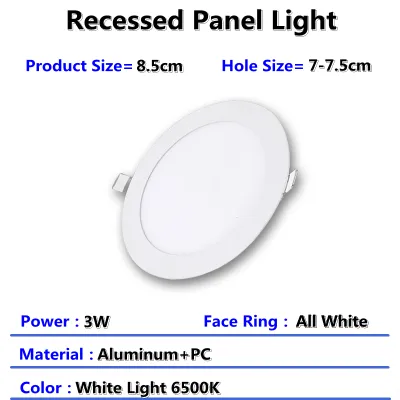
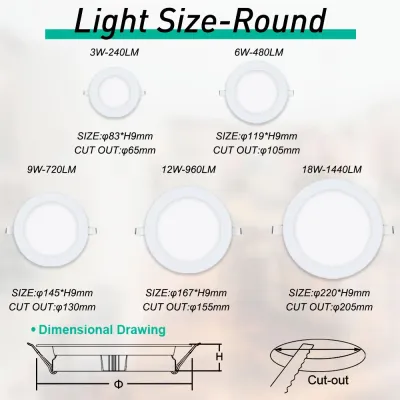
Prices are valid at publication and may change. Please refer to the product page for the latest price.
Recessed LED panels sit completely flush with the ceiling line, making them the ultimate space-saving option. These fixtures are incredibly thin, often measuring just 1 to 1.2 centimeters in thickness. However, the term “ultra-slim” can be misleading. While the visible light-emitting portion of the panel is thin, the external LED driver (the transformer that converts your home’s alternating current to direct current) is a separate physical box. This driver, along with the mounting spring clips, requires a hidden ceiling cavity depth of at least 3 to 5 centimeters. You can only use recessed panels if your condo has a suspended gypsum or plasterboard ceiling with adequate plenum space.
If your condo features solid concrete ceilings, cutting or chipping into the concrete to recess a light fixture is structurally dangerous and almost universally prohibited by condominium administration rules. In this scenario, you must use a surface-mounted (flush mount) LED panel. High-quality surface-mount panels range from 2 to 3.5 centimeters in thickness. They feature an integrated mounting bracket or a slim outer frame that houses both the light guide plate and the LED driver. While they sit slightly below the ceiling plane, their low-profile, straight-edged design still maintains a clean, unobstructed overhead view.
Before purchasing any fixture, verify the total installation depth required by the manufacturer. For recessed models, measure the distance between your concrete slab and the gypsum board ceiling to ensure the driver and wiring can sit comfortably without being pinched or bent. For surface-mounted models, look for designs where the driver is neatly tucked into a central recess in the back of the panel, allowing the outer edges of the frame to sit perfectly flush against your concrete ceiling.
Matching Panel Dimensions to Your Room Layout
Selecting the right length and width for your LED panels is a balancing act between light output and visual proportion. Common industry sizes include square panels (30×30 cm and 60×60 cm), rectangular panels (30×120 cm), and smaller round or square flush mounts (ranging from 10 to 22 cm). Installing a fixture that is physically too large can make a low ceiling feel heavy and visually oppressive, while using too many tiny fixtures can create a cluttered, chaotic ceiling pattern.

To keep your ceiling looking clean and expansive, scale the physical footprint of the fixture to the square meterage of the room. A single, massive panel draws immediate attention to the ceiling’s low height. Instead, aim to distribute the light source. You can calculate the general lighting requirement of your space using lumens (the measure of total visible light output) rather than wattage. For general living areas, aim for approximately 150 to 200 lumens per square meter, while kitchens and workspaces benefit from 300 to 400 lumens per square meter.
Open-Plan Living and Dining Areas
In a typical Philippine condo where the living, dining, and kitchen areas flow into one another, lighting can be used to define distinct functional zones without physical walls. For the living room lounge, a grid of four small, round or square 12-watt LED panels (roughly 15 to 17 centimeters in diameter) spaced evenly apart creates a soft, ambient wash of light. This layout keeps the center of the ceiling clear, which visually raises the height of the room.
Over the dining table, rather than a hanging pendant that blocks the view across the room, consider a single linear 30 by 120 centimeter surface-mounted panel. This long, slim profile aligns beautifully with rectangular dining tables, providing excellent task lighting while maintaining a completely open sightline. In the adjacent kitchen zone, a single 60 by 60 centimeter panel offers bright, shadow-free illumination perfect for food preparation, mimicking the effect of a natural skylight.
Compact Bedrooms and Hallways
Small bedrooms and narrow entry hallways require a highly restrained approach to fixture sizing. An oversized panel in a compact bedroom can cause intense glare when you are lying in bed, leading to eye strain and discomfort. For a standard 9-to-12 square meter bedroom, one or two 22-centimeter (8-inch) round flush-mount panels rated at 15 to 18 watts will provide ample illumination.
For hallways and corridors, linear layouts work best. Avoid placing square panels in a tight row, which can feel institutional. Instead, opt for ultra-slim, round mini-panels (10 to 12 centimeters in diameter) spaced 1.2 to 1.5 meters apart. This creates a gentle, guiding pathway of light that makes narrow passages feel wider and more inviting.
Managing Brightness and Glare at Close Range
Because low ceilings place the light source closer to your eyes—often less than 1.5 meters away when you are standing—managing glare and light quality is critical for daily comfort. Direct exposure to exposed LED chips can cause headaches and visual fatigue. Therefore, the internal optical design of the panel light is just as important as its physical dimensions.
When shopping, look for edge-lit LED panels rather than back-lit models. Edge-lit panels feature LED chips mounted around the inner frame, shining inward into a light guide plate that disperses the light downward through a diffuser. This design allows the panel to be incredibly thin (often under 1.5 centimeters) and produces a highly uniform, soft glow with no visible hotspots. Back-lit panels have LEDs pointing directly downward; while they are highly energy-efficient, they require a thicker housing (usually 3 to 5 centimeters) to allow the light to spread, and cheap models can display distracting bright spots.
Pay close attention to the diffuser material used in the panel. High-quality panels use PMMA (polymethyl methacrylate) diffusers, which distribute light evenly and resist yellowing over time. Cheaper panels often use PS (polystyrene) diffusers, which degrade rapidly under the heat of the LEDs and the ambient humidity of tropical climates, turning a brittle, unsightly yellow that reduces light transmission by up to 30 percent. Look for panels with a micro-prismatic or frosted finish to further soften the light output.
Color temperature dramatically alters the perceived height and feel of a room. Cool daylight (6000K to 6500K) is highly functional for kitchens and bathrooms but can feel clinical and harsh in low-ceiling living areas. Warm white (3000K) or cool white/neutral white (4000K) is highly recommended for living rooms and bedrooms, as these tones create a cozy, relaxing atmosphere. Many modern LED panels feature a manual CCT (Correlated Color Temperature) switch on the back of the driver, allowing you to toggle between warm, neutral, and daylight settings before installation.
For ultimate control over your environment, select dimmable LED panels. Ensure that the panel’s driver is compatible with standard triac wall dimmers. Dimming your lights in the evening reduces contrast glare, softens the transitions between spaces, and helps transition your body into a restful state.
Installation Clearances and Common Sizing Mistakes
Achieving a flawless, safe installation requires careful planning and adherence to electrical standards. One of the most common mistakes is purchasing recessed panels based solely on the thinness of the light plate, only to discover during installation that the ceiling cavity is blocked by metal studs, concrete beams, or utility pipes. Always map out your ceiling structure before buying.
- Ceiling Cavity Check: For recessed installations, use a stud finder or tap the plasterboard to locate the metal framing channels (double furring). Your cutouts must not cut through these structural supports.
- Junction Box Alignment: For surface-mounted panels, ensure the fixture's mounting plate aligns with your existing ceiling junction box. Some ultra-slim surface panels have very little internal wiring space, requiring the electrical connections to be pushed up into the junction box entirely.
- Thermal Management: While LEDs are highly efficient, they still generate heat at the junction point of the diode. In warm, humid tropical environments, heat is the primary enemy of LED lifespans. Cheap plastic-bodied panels trap heat, causing the light output to degrade and the driver to fail prematurely. Opt for panels with aluminum frames and backplates, which act as passive heat sinks to dissipate heat efficiently.
- Electrical Certification: Ensure all fixtures carry local safety certifications, such as the Philippine Standard (PS) mark or an Import Commodity Clearance (ICC) sticker, verifying they are rated for the standard 220V-240V AC, 60Hz power grid.
Safety must always be your top priority. Before attempting any electrical work, isolate the power supply by switching off the corresponding circuit breaker at your main panel board. Use a non-contact voltage tester to verify the wires are dead before touching them. If your installation requires running new electrical lines, cutting through structural plasterboard, or mounting heavy surface fixtures, always hire a licensed master electrician or a qualified professional installer. Additionally, check your condominium corporation’s house rules, as many properties require prior written approval and certified contractors for any modifications to electrical wiring or ceilings.
Frequently Asked Questions (FAQ)
Can I install a recessed LED panel in a concrete condo ceiling?
No, you cannot install a recessed LED panel directly into a solid concrete ceiling slab. Recessing a fixture requires cutting a hole deep enough to house the panel housing and its external driver, which compromises the structural integrity of the concrete slab and violates condominium building codes. If you have a solid concrete ceiling, you must use a surface-mounted LED panel light. Alternatively, you can hire a professional to construct a suspended gypsum board drop ceiling (which typically lowers your overall ceiling height by 5 to 7 centimeters) to accommodate recessed fixtures.
Do ultra-slim LED panels overheat in tropical climates?
Ultra-slim LED panels can overheat in tropical climates if they are poorly constructed or installed in tight, unventilated spaces. High ambient temperatures and humidity accelerate heat buildup around the LED chips and driver. To prevent overheating and premature failure, always choose panels constructed with high-grade aluminum frames, which transfer heat away from the electronics much better than all-plastic models. If you are installing recessed panels in a ceiling cavity, ensure there is at least 2 to 3 centimeters of clearance around the fixture for passive airflow, and avoid packing thermal insulation directly over the light driver.
Community discussion
Share your experience or ask a question. Comments are reviewed before publication.