
Quick Answer: What to Expect When Installing LED Strips
Installing LED strip lights is one of the most effective ways to personalize a condominium unit, adding depth, warmth, and modern sophistication to compact urban spaces. The entire installation process is highly manageable as a weekend DIY project and generally spans four key phases: planning your layout, preparing the mounting surface, physically securing the strips, and establishing a safe electrical connection.
Before purchasing any materials, always review your condominium’s building administration guidelines regarding electrical modifications and temporary fixtures. Additionally, electrical safety must be your top priority. You must verify that the operating voltage of your chosen LED strip matches the output voltage of your power adapter, and ensure that your setup does not exceed the safe load limits of your condo’s electrical outlets.
Tools and Materials Checklist for Condo Installation
To achieve a clean, professional-looking installation without risking your security deposit or damaging condo finishes, you need to gather the right tools and materials before starting. Standard adhesive backings often struggle on typical condo surfaces, so planning for damage-free alternatives is highly beneficial.
Products mentioned in this guide
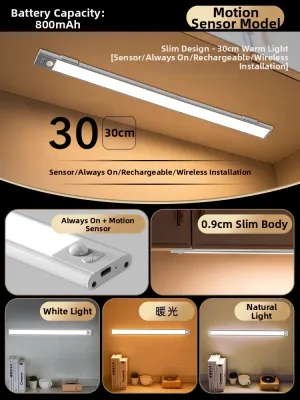
Prices are valid at publication and may change. Please refer to the product page for the latest price.

- LED Strip Light Kit: This should include the LED strips, a compatible power adapter (driver), and a controller or receiver (for remote or smart app adjustments).
- Measuring Tape and Scissors: Essential for calculating exact lengths and cutting the strips at designated points.
- Cleaning Supplies: Isopropyl alcohol (70% concentration) and a clean microfiber cloth to prep the mounting area.
- Condo-Friendly Mounting Aids: Aluminum channels with frosted diffusers protect the strips from dust and heat while creating a smooth, dot-free glow. These channels can be mounted using heavy-duty, double-sided acrylic mounting tape, which provides an exceptionally strong bond without the need for drilling into concrete.
- Cable Management Accessories: Adhesive-backed cable clips and wire loom tubing keep power cords neatly tucked away.
- Safety Equipment: A non-contact voltage tester to verify outlet safety before plugging in your equipment.
Planning Your Layout and Power Source
A successful installation relies entirely on careful planning. Begin by identifying the specific zones you want to illuminate. Common condo layouts benefit greatly from cove lighting in the living room, under-cabinet illumination in the kitchen, bias lighting behind the television, or accent lighting along bedroom headboards. Use your measuring tape to record the exact length of the surfaces where the lights will be installed.
Next, locate your nearest power outlet. The path from the end of the LED strip to the outlet must be clear, dry, and free of foot traffic to prevent tripping hazards. Avoid running power cables across doorways, under heavy rugs, or near areas prone to moisture, such as kitchen sinks or bathroom entryways.
Before finalizing your layout, calculate the electrical load to prevent overloading your power adapter. Check the manufacturer’s specifications on the product labels for the wattage rating per meter. Multiply this value by the total length of the strip you plan to install. For safety and longevity, follow the “80% rule”: the total wattage of your LED strips should not exceed 80% of your power adapter’s maximum rated capacity. For example, if your adapter is rated for 60 watts, limit your continuous LED load to 48 watts.
Step-by-Step Installation Process
Transitioning from the planning phase to physical installation requires a methodical approach to protect both your equipment and your condo’s interior. Taking your time during these steps ensures a clean aesthetic and a reliable electrical connection.
Always keep the power adapter completely unplugged from the wall outlet during the entire preparation, cutting, and mounting process. Working on live components increases the risk of short circuits and accidental damage to the delicate light-emitting diodes.
Preparing the Mounting Surface
Proper surface preparation is critical, especially in tropical climates where high humidity and ambient moisture can severely compromise adhesive performance. Dust, grease, and microscopic oil films on walls or cabinetry will prevent mounting tapes from bonding securely, leading to sagging strips over time.
Start by wiping down the entire mounting surface with a microfiber cloth dampened with isopropyl alcohol. Avoid using household glass cleaners or multi-surface sprays, as they often leave behind a thin, slick residue that impairs adhesion. Allow the surface to dry completely for at least ten to fifteen minutes.
Inspect the condition of the surface. If you are mounting to a ceiling cove with peeling paint, chalky concrete, or highly textured plaster, standard adhesive backing will not hold. In these scenarios, you must use aluminum channels secured with heavy-duty, high-bond acrylic mounting tape, or consult your building administration to see if lightweight mechanical mounting clips are permitted.
Mounting the LED Strips and Channels
If you are using aluminum channels, mount the channels to your prepared surface first. Once the channels are securely in place, peel away the protective backing of the LED strip in small, manageable sections—about 30 centimeters at a time—and press the strip firmly into the center of the channel. If you are mounting the strip directly to a clean surface, apply firm, even pressure along the entire length of the strip for at least 30 seconds per section to activate the pressure-sensitive adhesive.
When you reach the end of your planned run, you may need to shorten the strip. You must only cut the LED strip along the clearly marked cut lines, which are typically indicated by a scissor icon or a set of exposed copper pads. Cutting anywhere else will permanently sever the electrical circuit, rendering that entire section of the strip useless.
Navigating corners requires careful handling. Never bend an LED strip at a sharp 90-degree angle, as this will crack the delicate internal copper traces and cause the lights beyond the bend to fail. Instead, use solderless corner connectors (L-shaped connectors) to bridge the gap, or employ a gentle “ribbon fold” technique that loops the strip upward without creasing the circuit board.
Connecting the Power Supply and Controller
With the strips physically mounted, you can now connect them to the control receiver and the power supply. Begin by matching the polarity and pin configuration between the LED strip and the controller. For single-color strips, align the positive (+) and negative (-) markings. For multi-color RGB strips, carefully align the corresponding pins (typically labeled R, G, B, and V+) with the receiver’s input port.
Ensure all connections are physically secure. If you are using solderless clip-on connectors, verify that the metal teeth of the connector make direct, firm contact with the copper pads on the LED strip before snapping the plastic cover shut. Loose connections are the primary cause of flickering lights and localized overheating.
Once the connections are secure, route the power cable neatly down to the outlet. Use adhesive-backed cable management clips to secure the wire along the corners of walls or the undersides of cabinets, keeping the power brick and excess cabling hidden from plain sight.
Testing and Adjusting the Lighting
Before declaring the project complete, perform a thorough system test. Plug the power adapter into the wall outlet and turn on the system using your remote control, wall switch, or smart home application.
Cycle through all available color modes, color temperatures, and dimming levels. Inspect the entire length of the strip to ensure every individual diode illuminates correctly. Look closely for any dark spots, flickering sections, or sudden drops in brightness near the end of the run, which could indicate a loose connector or voltage drop.
Finally, make any necessary physical adjustments. If you notice harsh “hot spots” or uneven glare reflecting off polished countertops or television screens, adjust the position of your aluminum channel diffusers. If you are using a direct-mount setup, you may need to slightly adjust the angle of the strip or add a frosted plastic barrier to soften the light and achieve a smooth, continuous ambient glow.
Condo-Specific Safety and Maintenance Rules
Living in a condominium requires shared responsibility for electrical safety and structural integrity. Because condo units share walls and electrical risers, improper installations can pose risks that extend beyond your own front door.
- Electrical Safety Boundaries: Never attempt to hardwire an LED driver directly into your condo's main electrical panel or existing wall switches unless you are a qualified professional. For any fixed wiring modifications, always isolate the power at the main circuit breaker first. If you plan to install LED strips in damp environments like bathrooms or open balconies, you must use strips rated IP65 or higher, housed in watertight enclosures, and connected to a Ground Fault Circuit Interrupter (GFCI) outlet.
- Building Administration Compliance: Always consult your building's property management office before undertaking any installation that involves drilling into structural concrete columns, shear walls, or common-area ceilings. Non-destructive mounting methods are highly preferred and prevent costly penalties when moving out.
- Routine Maintenance: Over time, tropical dust and humidity can accumulate on your light fixtures. Periodically turn off the power supply and wipe down the LED strips or diffuser covers with a dry, anti-static microfiber cloth. During operation, occasionally touch the power adapter; it should feel warm, but never hot. If the adapter feels excessively hot to the touch, unplug it immediately and verify that your setup is not overloading the driver's rated capacity.
Frequently Asked Questions (FAQ)
Can I install LED strip lights on a concrete condo ceiling without drilling?
Yes, you can easily install LED strip lights on concrete ceilings without drilling. Because bare or painted concrete is porous and prone to absorbing moisture in humid climates, standard adhesive backings will eventually fail. To solve this, use heavy-duty, double-sided acrylic foam mounting tape to secure lightweight aluminum channels or rigid plastic tracks directly to the concrete. This tape creates a powerful, long-lasting bond that can support the weight of the channels. If your ceiling has old, flaking paint, avoid strong adhesives as they may pull the paint away; in such cases, consult your building administration for approved lightweight mechanical fasteners.
Do LED strip lights consume a lot of electricity?
No, LED strip lights are exceptionally energy-efficient and consume significantly less electricity than traditional incandescent or halogen accent lights. To estimate your exact consumption, locate the manufacturer’s wattage-per-meter rating on the product packaging. Multiply this number by the total length of the installed strip to find the hourly wattage. For example, a 5-meter strip rated at 4.8 watts per meter consumes 24 watts per hour at maximum brightness. Running this setup for five hours a day consumes 120 watt-hours (0.12 kilowatt-hours), resulting in a negligible impact on your monthly utility bill.
Community discussion
Share your experience or ask a question. Comments are reviewed before publication.