
Setting up a spooky, high-quality Halloween photo background at home often feels like an expensive, complicated chore, especially when dealing with limited space, humid tropical weather that makes paper decorations sag, or harsh indoor lighting that washes out the eerie atmosphere. You can easily create a captivating, professional-looking Halloween backdrop on a budget by selecting a structurally sound wall, using affordable foundational layers like dark fabrics, and arranging your decorations in distinct foreground, mid-ground, and background layers to build visual depth. With a few strategic adjustments to your lighting and camera angles, you can transform a small corner of your living room into a hauntingly beautiful set for social media photos, family portraits, or themed video calls.
How do you choose the right wall and lighting for your Halloween backdrop?
To choose the ideal wall and lighting for your Halloween backdrop, select a flat surface with at least two meters of clear floor space in front of it and position your light sources to cast dramatic shadows rather than flat, direct glare. Having enough physical clearance is essential because it allows you to position your camera, tripod, and subject comfortably without crowding the decorations. If the space is too tight, your subject will be pressed directly against the wall, which flattens the image and makes it difficult to achieve a pleasing depth of field.
When evaluating your lighting, avoid mixing natural daylight with warm indoor artificial light. Mixed color temperatures can distort the colors of your decor, making vibrant oranges look muddy and deep purples look washed out. If you are shooting during the day, close the curtains to block out unpredictable sunlight and rely entirely on controlled indoor light sources. For a classic spooky atmosphere, cool-toned or colored LED lights work exceptionally well, but they should be positioned at an angle rather than directly in front of the subject to prevent harsh reflections.
Products mentioned in this guide

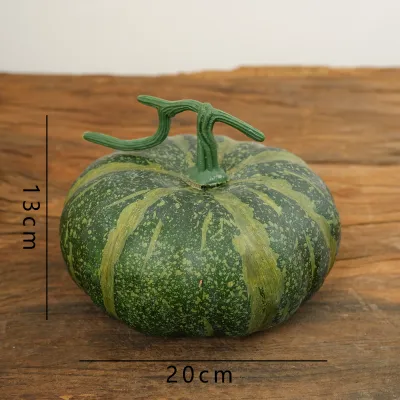

Prices are valid at publication and may change. Please refer to the product page for the latest price.
Before hanging any decorations, inspect the texture and condition of your wall surface. In humid tropical climates, moisture in the air can weaken adhesives, causing heavy decorations to fall or tape to pull paint and wallpaper off the wall upon removal. Matte or textured walls are particularly sensitive to strong adhesives, so it is safer to use lightweight painter’s tape or removable mounting putty.
Finally, if you plan to incorporate electronic props, string lights, or glowing jack-o’-lanterns, ensure that a grounded electrical outlet is safely accessible. Avoid running long extension cords across high-traffic walkways where they present a tripping hazard. Always verify that any plug-in lighting matches the standard local voltage of 220V, check the wattage limits of your extension cords, and look for official electrical safety certifications, such as the Philippine Standard (PS) or Import Commodity Clearance (ICC) marks, to ensure your setup remains safe throughout your photo session.
Which affordable Halloween background decor items build a cohesive theme?
Building a cohesive theme on a budget relies on choosing versatile, low-cost foundational materials like dark fabrics or plastic tablecloths, paired with reusable paper accents and repurposed household items. You do not need to purchase expensive, single-use backdrops to achieve a professional look. Instead, start with a dark base layer to completely cover the everyday details of your wall. Black flat bedsheets, dark gray curtains, or inexpensive black tulle work beautifully as a canvas. Alternatively, you can purchase budget-friendly black or deep purple plastic tablecloths for around ₱50 to ₱100 at local general merchandise stores, which provide a clean, dark surface that instantly sets a moody tone.
Once your base layer is set, introduce mid-ground elements to add texture and thematic focus. Paper banners, cardboard bat cutouts, and orange paper garlands are incredibly cost-effective and lightweight, meaning they put minimal stress on your wall adhesives. You can also find pre-made paper decor kits on online marketplaces. When sourcing these budget-friendly bundles, always read the product descriptions carefully to verify the exact dimensions and materials; online product photos can sometimes make small paper cutouts appear much larger than they are in reality.
To make the scene feel authentic and lived-in, look around your home for items you can repurpose as foreground props. Empty glass jars can be washed and filled with battery-operated LED tea lights to mimic glowing potions. Stacked old books with dark covers, dry twigs gathered from the garden, or a simple wooden stool can serve as excellent rustic platforms for your setup.
If you want to add a classic Halloween element, a bag of synthetic spiderwebbing is highly affordable and goes a long way. The key to using faux spiderwebs is to stretch them as thin as possible; clumpy, thick webs look artificial and block too much of your background. By combining these inexpensive textures—matte paper, sheer tulle, rustic wood, and wispy webbing—you create a rich, cohesive visual narrative without overspending.
How should you layer and arrange the decor items for visual depth?
To layer and arrange your Halloween decor for maximum visual depth, secure your heaviest background elements flat against the wall first, then stagger mid-ground decorations at varying heights, and place physical props in the immediate foreground to frame your subject. Creating a three-dimensional effect prevents your photos from looking like a flat, two-dimensional wall display.
Begin by securing your base fabric or plastic tablecloth smoothly against the wall. To prevent wrinkles and sagging, pull the material taut and secure it at the top corners and along the sides. Because high humidity can cause standard tape to lose its grip, use high-quality, clean-removal painter’s tape or heavy-duty removable mounting putty. If you are using a delicate fabric like tulle or cheesecloth, you can let it drape naturally to create organic, shadowy folds that catch the light beautifully.
Next, arrange your mid-ground elements, such as paper bats, hanging skeletons, or garlands. Instead of hanging everything in a straight horizontal line, stagger them at different heights and angles. For example, place a flight of cardboard bats curving upward from one side of the frame to the other, which guides the viewer’s eye naturally through the photo. If you are using string lights, drape them gently across the mid-ground, ensuring they do not touch flammable paper decorations or drape over hot light bulbs.
The final step is positioning your foreground props. Place a small table, a wooden crate, or a stool slightly to the side of where your subject will stand or sit. Arrange your repurposed glass jars, faux pumpkins, or old books on this surface. This foreground layer frames the subject and establishes a clear sense of scale and perspective. Keep a reasonable distance—ideally about half a meter to one meter—between the foreground props, the subject, and the background wall. This spacing ensures the background remains a supportive element rather than a cluttered distraction that competes with the main subject.
What camera angles and framing techniques highlight the Halloween decor?
Highlighting your Halloween decor requires positioning your camera at eye level, leaving balanced negative space around your subject, and using strategic off-camera lighting to create depth and separation. Even the most carefully arranged background can look underwhelming if the camera is placed at an awkward angle or if the framing is too tight.
When setting up your camera or smartphone on a tripod, aim for eye level or slightly lower to give the scene a grander, more dramatic feel. Avoid high angles that look down on the subject, as this can compress the background and make your carefully placed props disappear from the frame. Leave adequate negative space—empty areas around the subject’s head and shoulders—so that the key decorative elements, like hanging bats or glowing lanterns, are clearly visible and not blocked by the person in the photo.
To achieve a professional, soft-focus background, increase the physical distance between your subject and the decorated wall. If your subject stands at least 1.5 to 2 meters away from the backdrop, a camera with a wide aperture (or a smartphone set to portrait mode) will naturally blur the background slightly. This subtle blur keeps the focus sharply on the subject while transforming your affordable decorations into a beautiful, atmospheric wash of colors and shapes.
You can also use simple household lamps placed just out of the camera frame to enhance the mood. Position a lamp behind and to the side of your subject, pointing toward their back. This technique, known as rim lighting, creates a bright outline around the subject’s hair and shoulders, separating them cleanly from a dark background. Before you begin taking photos, look through the viewfinder or screen to perform a final frame check. Scan the edges of the frame and remove any distracting everyday objects, such as modern light switches, wall outlets, or fan blades, to ensure the spooky illusion remains completely unbroken.
Community discussion
Share your experience or ask a question. Comments are reviewed before publication.