
Selecting a dining ceiling light for a condominium with a 2.4-meter ceiling height requires balancing physical clearance, visual proportion, and functional illumination. In a compact space, a fixture that is too large or hangs too low can make the dining area feel cramped and pose a physical hazard. To achieve the perfect balance, choose a dining ceiling light with a diameter equal to one-half to two-thirds the width of your dining table, and ensure the bottom of the fixture sits 75 to 90 centimeters above the tabletop. Because a 2.4-meter ceiling limits your vertical space, prioritizing low-profile fixtures like flush mounts, semi-flush mounts, or adjustable recessed downlights is essential to preserve headroom while maintaining an open, airy aesthetic.
Understanding the 2.4-Meter Condo Ceiling Constraint
A ceiling height of 2.4 meters (approximately 8 feet) is the standard vertical clearance in many modern high-rise condominium developments across the Philippines. While this height is structurally sound and energy-efficient for cooling in tropical climates, it significantly restricts the vertical volume of a room compared to traditional 2.7-meter or 3-meter residential ceilings. When decorating a dining alcove, this limited height means you cannot simply install any fixture you find appealing in a showroom.
Hanging a long, dramatic pendant or a heavy, multi-tiered chandelier in a 2.4-meter space introduces both physical and visual risks. Physically, low-hanging fixtures create a constant head-strike hazard for taller family members and guests when they stand up, pull out chairs, or move around the table. Visually, a bulky fixture dominates the upper third of the room, drawing the eye downward and making the entire dining area feel claustrophobic and smaller than it actually is.
Products mentioned in this guide
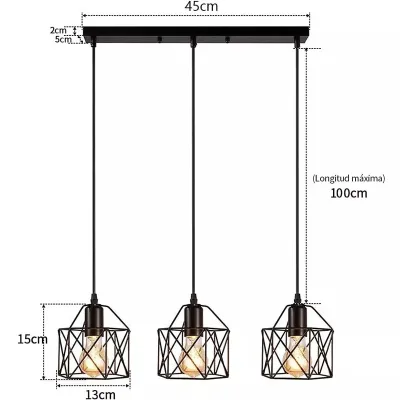
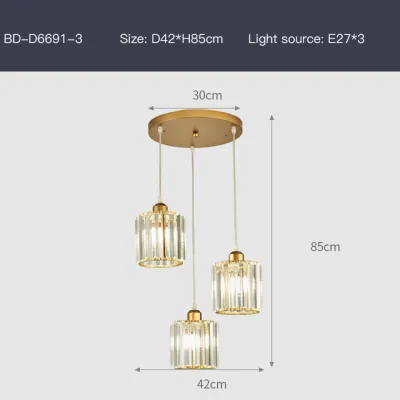
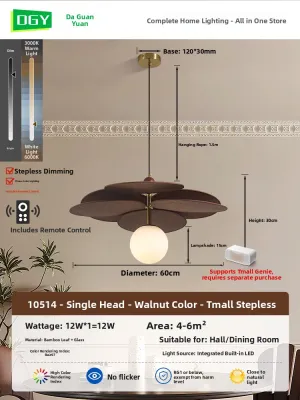
Prices are valid at publication and may change. Please refer to the product page for the latest price.
To design a comfortable and functional dining space, you must shift your focus toward low-profile lighting solutions. Selecting a dedicated dining ceiling light that hugs the ceiling—such as a refined flush mount, a shallow semi-flush mount, or a strategically placed linear system—allows you to preserve valuable headroom. This approach maintains the proportional balance of the room, ensuring that your lighting enhances the dining experience rather than cluttering the physical environment.
Calculating the Right Fixture Diameter for Your Table
To ensure your dining ceiling light looks intentional and provides balanced illumination, you must calculate its ideal diameter based on the size of your dining table and the dimensions of the room. A light that is too wide will overwhelm the table and create harsh shadows at the edges, while a fixture that is too small will look lost and fail to light the entire dining surface.

The Table-to-Fixture Ratio
The primary rule of thumb is that the diameter or width of your light fixture should be between one-half and two-thirds the width of the dining table. For example, if you have a circular four-seater dining table with a diameter of 90 centimeters, your ceiling light should have a diameter between 45 and 60 centimeters. If you are using a rectangular six-seater table that is 80 centimeters wide, look for a fixture with a width or diameter of 40 to 53 centimeters. This ratio ensures that the light source is wide enough to cast even illumination across the entire dining surface without extending past the edges of the table where people sit.
The Room Size Formula
To double-check your sizing against the overall room volume, you can use the classic room-dimension formula. Measure the length and width of the dining area in feet, add those two numbers together, and convert the sum directly into inches to find the ideal fixture diameter. For instance, if your condo’s dining alcove measures 9 feet by 9 feet, adding these numbers yields 18. This indicates that a fixture with an 18-inch (approximately 46-centimeter) diameter will harmonize beautifully with the overall scale of the room.
Matching Fixture and Table Shapes
The shape of your dining ceiling light should complement the geometry of your table to optimize light distribution.
- Round and Square Tables: These benefit most from symmetrical, centralized fixtures. A single round, square, or hexagonal flush mount or semi-flush mount concentrates the light evenly outward, mirroring the table's footprint.
- Rectangular and Oval Tables: These elongated shapes require linear fixtures, track lighting, or a series of multiple small flush mounts spaced evenly along the center line. A single small circular light over a long rectangular table will leave the ends of the table in deep shadow, whereas a linear fixture ensures every diner has adequate light.
Finding the Ideal Mounting Height and Clearance
Once you have determined the correct diameter, the next step is establishing the precise mounting height. In a condo with a 2.4-meter ceiling, every centimeter of vertical clearance matters, requiring careful measurement before final installation.
Standard Table Clearance
In standard residential settings, the bottom of a dining light fixture should hang 75 to 90 centimeters (30 to 36 inches) above the tabletop. This height is low enough to focus light directly onto the food, tableware, and centerpieces, yet high enough to keep the light source out of the direct line of sight of diners sitting opposite one another. This range ensures that faces are clearly visible and illuminated without being subjected to direct bulb glare.
Adjusting the Math for 2.4-Meter Ceilings
When working with a strict 2.4-meter (240-centimeter) ceiling height, you must calculate the remaining vertical space to see what types of fixtures can physically fit.
- Standard dining table height: 75 centimeters.
- Total vertical space above the tabletop: 240 cm – 75 cm = 165 centimeters.
- If you maintain a standard clearance of 75 centimeters above the table, you are left with exactly 90 centimeters of space (165 cm – 75 cm) for the fixture itself, including its mounting canopy, chain, or stem.
- If you opt for a 90-centimeter clearance above the table, you have only 75 centimeters of space left for the fixture.
While a 75-centimeter-tall fixture is technically possible, it will look massive and visually crowd a low-ceiling condo. Therefore, choosing a low-profile fixture with a total vertical height (or drop) of 15 to 40 centimeters is highly recommended. This allows you to position the light 125 to 150 centimeters above the tabletop, which is higher than standard recommendations but essential for preserving visual openness in a compact condo.
Floor and Walking Clearance
If your dining table is positioned in an open-plan layout where the light fixture hangs near or directly over a primary walking path, you must prioritize pedestrian safety. In these configurations, maintain a minimum clearance of 2 meters (approximately 6.5 feet) from the floor to the bottom of the fixture. This safety margin prevents taller residents and visitors from colliding with the light. If your layout requires people to walk beneath the light, a true flush mount fixture is the safest and most practical choice.
Best Dining Ceiling Light Types for Low Ceilings
Navigating the market for a dining ceiling light reveals several distinct design categories. Understanding the functional advantages and limitations of each type will help you make an informed decision for your 2.4-meter ceiling.
Flush Mount Lights
Flush mount fixtures install directly against the ceiling surface, leaving no gap between the light and the ceiling slab. This category offers the maximum possible headroom, making it the premier choice for low ceilings. To ensure a pleasant dining experience, avoid industrial utility lights. Instead, select flush mounts featuring frosted glass, acrylic, or fabric diffusers. These materials soften the downward light, eliminating harsh glares on polished wooden or glass tabletops and creating a gentle, inviting glow.
Semi-Flush Mount Lights
Semi-flush mount lights hang from a very short stem or canopy, leaving a small gap of 10 to 30 centimeters between the fixture and the ceiling. This design is highly advantageous because it allows light to cast upward as well as downward. The light reflecting off a white or light-colored ceiling creates an illusion of height, making the entire room feel taller and more spacious. This option is ideal if your dining table is permanently anchored in place and safe from foot traffic.
Recessed Lighting (Downlights)
For a sleek, ultra-modern aesthetic, recessed downlights install completely inside a suspended gypsum ceiling, taking up zero physical or visual space in the room. To make recessed lighting work for a dining area, avoid fixed downlights that cast harsh, vertical shadows on diners’ faces. Instead, opt for adjustable gimbal downlights. These allow you to tilt the light source, directing the beam precisely onto the dining table to highlight the food while keeping the surrounding seating area softly illuminated.
Linear and Track Lighting
If you have an elongated dining table, linear or track lighting systems mounted close to the ceiling provide an excellent solution. Track lighting allows you to position multiple small, adjustable spotlights along a single track. You can angle individual lights toward the table ends, the center, or even nearby wall art, offering unmatched flexibility without the need for a low-hanging, bulky fixture.
Common Sizing and Placement Mistakes to Avoid
Even with precise measurements, small oversight errors can compromise the comfort and safety of your dining space. Awareness of these common pitfalls will help you avoid costly post-installation adjustments.
Choosing an Undersized Fixture
Out of fear of crowding a low ceiling, some condo owners select a tiny, single-bulb fixture that is far too small for their table. An undersized light looks disproportionate and fails to distribute light evenly, leaving the outer edges of the table in shadow and forcing diners to eat in dim conditions.
Hanging the Fixture Too Low
Attempting to mimic high-ceiling dining designs by hanging a fixture too low in a 2.4-meter space is a recipe for physical discomfort. It blocks the line of sight across the table, making conversation difficult, and creates a constant risk of head-strikes when guests stand up or lean forward to reach for dishes.
Ignoring Light Spread and Beam Angle
A fixture that casts a very narrow, concentrated beam of light acts like a spotlight, creating intense glare in the center of the table while leaving the rest of the dining area dark. Ensure your chosen dining ceiling light has a wide beam angle or a high-quality diffuser that spreads light evenly across the entire dining surface.
Overlooking Bulb Color Temperature and Brightness
Using cold, clinical daylight bulbs (6000K to 6500K) in a dining area is a common mistake that ruins the ambiance. High-temperature cool light makes food look unappealing and creates a harsh, sterile environment. Opt instead for warm white (2700K to 3000K) or warm-neutral (3500K to 4000K) bulbs, which mimic candlelight and promote a relaxing, appetizing atmosphere.
Installation and Safety Checks for Condo Wiring and Mounting
Before purchasing and mounting your new dining ceiling light, you must verify several electrical and structural specifications to ensure a safe, long-lasting installation.
Electrical Specifications
Always verify that your chosen fixture is fully compatible with the standard Philippine electrical grid, which operates at 220V to 240V at 60Hz. Check the manufacturer’s label for the maximum wattage limit of the socket, and ensure your bulbs do not exceed this rating. Utilizing energy-efficient LED bulbs is highly recommended for low ceilings, as they emit minimal heat compared to traditional incandescent or halogen bulbs, preventing the dining area from becoming uncomfortably warm.
Structural Support and Mounting
Condo ceilings in the Philippines generally fall into two categories: solid concrete slabs or suspended gypsum board (drywall) ceilings.
- Solid Concrete Slabs: Heavy fixtures must be anchored directly into the concrete slab using masonry expansion bolts. This requires a hammer drill and specialized bits.
- Suspended Gypsum Ceilings: Gypsum board cannot support the weight of a light fixture on its own. The mounting bracket must be anchored directly into the underlying metal furring or joists. If no joist is available, you must use heavy-duty toggle bolts, but this is only suitable for lightweight fixtures.
Safety Boundaries
Before performing any electrical work, always shut off the main circuit breaker servicing the dining area at the electrical panel. Use a non-contact voltage tester to confirm that the wires are completely de-energized. If your installation requires running new wiring, moving the junction box, working at heights, or if you are uncertain about the structural load capacity of your ceiling, stop immediately and consult a licensed, professional electrician. Always follow the manufacturer’s provided installation instructions to preserve your fixture’s warranty and ensure electrical safety.
Frequently Asked Questions (FAQ)
Can I use a pendant light if my condo ceiling is exactly 2.4 meters?
Yes, you can use a pendant light, but only under strict conditions. The pendant must be positioned directly over the center of the dining table where there is no risk of foot traffic. You must carefully measure the drop so that the bottom of the pendant remains at least 75 centimeters above the tabletop, while also ensuring it does not interfere with the sightlines of seated guests or create a hazard when people stand up.
How many lumens do I need for a dining table in a small condo?
For a dining area, aim for approximately 300 to 400 lumens per square meter (lux). If your dining space is roughly 6 square meters, a total light output of 1,800 to 2,400 lumens is ideal. To maximize versatility, choose dimmable LED fixtures or smart bulbs; this allows you to use high-output lighting for tasks like cleaning or working, and easily dim the lights to a soft, warm glow for intimate dinners.
Community discussion
Share your experience or ask a question. Comments are reviewed before publication.