
Deciding whether the Bosca 200W solar flood light is suitable for your outdoor space requires a careful comparison between your property’s physical layout and the technical specifications printed on the product’s packaging. Solar lighting offers an energy-efficient way to illuminate dark driveways, expansive backyards, and vulnerable perimeter walls without adding to your monthly electricity bill. However, because solar performance relies entirely on local weather conditions and physical placement, a generic approach does not work. In tropical environments like the Philippines, where intense sunlight alternates with heavy monsoon rains and high humidity, verifying the build quality, battery capacity, and water resistance of your lighting fixture is essential before making a purchase.
Assessing Your Outdoor Lighting Needs
Before looking at any specific product labels, you must first define the primary purpose of your outdoor lighting. Security lighting for driveways and perimeter walls requires high-intensity, focused illumination that deters intruders and provides clear visibility for vehicles. In contrast, ambient lighting for backyards, patios, or leisure areas demands a softer, more diffused glow that enhances the aesthetic appeal of your landscaping without causing discomfort to your eyes. Clearly identifying this goal helps you determine the necessary brightness and light distribution for each zone.
Next, measure the physical dimensions of the target area. Use a measuring tape or a digital distance estimator to find the exact length and width of the space you want to illuminate. Note the planned mounting height, as the distance between the light fixture and the ground directly affects both the width of the light beam and the intensity of the light when it reaches the surface. A light mounted too high may cover a wide area but leave the ground dimly lit, while a light mounted too low will create a bright spot with very limited coverage.
Products mentioned in this guide
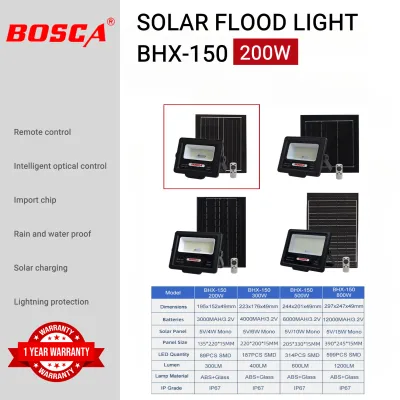
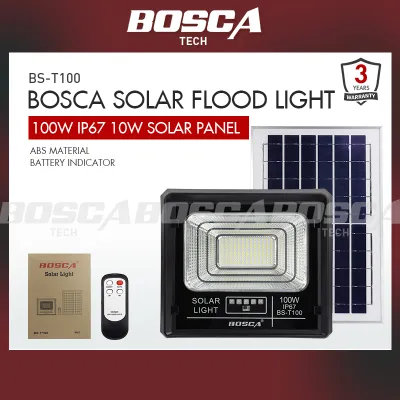
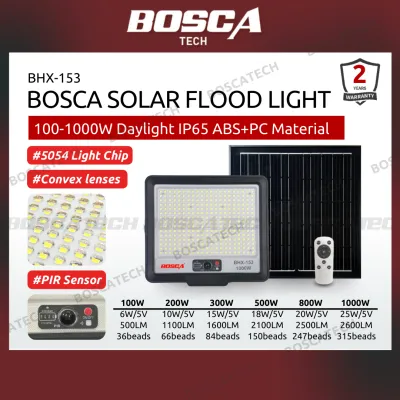
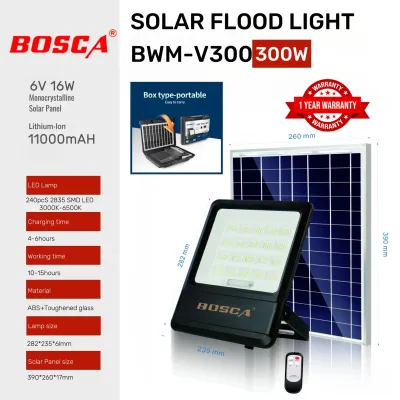
Prices are valid at publication and may change. Please refer to the product page for the latest price.
Finally, observe the existing light conditions around your property at night. Identify any ambient light pollution from streetlights, neighboring properties, or existing indoor lights spilling outdoors. These external light sources can interfere with the built-in sensors of solar flood lights, potentially preventing them from turning on automatically at dusk. Conversely, locate the absolute dark spots that receive no secondary light, as these areas will require targeted, high-output illumination to ensure safety and visibility.
Verifying Bosca 200W Specifications Against Your Space
To confirm if the Bosca 200W solar flood light matches your measured requirements, you must locate and interpret the technical specifications on the product packaging or the manufacturer’s user manual. Do not rely solely on the “200W” wattage rating, as wattage in solar LED fixtures refers to the nominal power rating of the system rather than direct light output. Instead, look for the lumen rating, which measures the actual visible light emitted by the fixture. Compare this lumen value to your spatial measurements to ensure it provides sufficient brightness for your intended use.

The beam angle is another critical specification to verify in the product manual. A wider beam angle, such as 120 degrees, distributes light across a broad horizontal plane, making it ideal for wide backyards or open driveways. A narrower beam angle concentrates the light into a focused spotlight, which is more suitable for highlighting specific architectural features or narrow pathways. Ensure the listed beam angle aligns with the coverage area you calculated during your initial spatial assessment.
Next, examine the battery capacity and solar panel specifications. Look for the battery rating, typically expressed in milliampere-hours (mAh) or watt-hours (Wh), and the solar panel’s output wattage. In tropical regions with frequent cloud cover, a larger battery capacity is necessary to store enough energy to keep the light running throughout the night. Check the manual to see the estimated charging time under direct sunlight and compare this with the average daylight hours your mounting location receives. A balanced ratio between panel output and battery capacity ensures the light remains operational even after overcast days.
Lastly, verify the Ingress Protection (IP) rating label on the physical fixture. Outdoor lights in humid, rain-prone environments require robust weatherproofing to prevent water and dust from damaging the internal electronics. Look for an IP65 or higher rating on the product casing. An IP65 rating indicates the fixture is dust-tight and protected against water jets from any angle, which is a baseline requirement for exposed outdoor installations. If the mounting spot is completely unsheltered and subjected to severe downpours, verifying a higher rating like IP66 or IP67 provides additional peace of mind.
Scene-by-Scene Suitability Check
Evaluating a solar flood light requires matching its verified specifications with the unique physical constraints of each outdoor zone. Different areas of your home present distinct challenges, from reflective surfaces to physical obstructions that can block sunlight or distort the light beam.
Driveways and Perimeter Walls
When installing a solar flood light along driveways or perimeter walls, security and navigation are your primary concerns. Verify that the fixture’s beam angle is wide enough to cover the entire width of your driveway without leaving dark blind spots where security risks could go unnoticed. If your driveway has a curved layout or is bordered by high walls, you may need to adjust the mounting angle or install multiple fixtures to ensure continuous coverage along the entire path.
If the model features an integrated motion sensor, check the manufacturer’s specifications for its detection range and angle. The sensor’s reach must align with the typical approach distance of vehicles or pedestrians entering your property. If the sensor range is too short, the light may only turn on when a vehicle is already halfway up the driveway, defeating the purpose of early detection. Ensure the sensor’s field of view is not obstructed by tree branches, columns, or decorative gate structures.
Additionally, consider the potential for glare. A high-output 200W LED light can produce intense glare if pointed directly at windshields or neighboring windows. To prevent blinding approaching drivers or causing a nuisance to your neighbors, plan to mount the light at a downward angle. Check that the mounting bracket allows for precise vertical adjustments so you can direct the light beam downward onto the pavement rather than outward into the eyes of oncoming traffic.
Backyards and Leisure Areas
For backyards, patios, and outdoor dining areas, the quality of light is just as important as the quantity. Check the color temperature label on the packaging, which is measured in Kelvin (K). A color temperature of 5000K to 6500K produces a cool, daylight-white light that is excellent for security but can feel harsh and clinical in a leisure space. If you prefer a cozy, inviting atmosphere for evening gatherings, look for a warmer color temperature, or consider using decorative accent lighting to soften the effect of a high-power flood light.
The physical placement of the light in a backyard must be planned carefully to avoid disrupting your outdoor activities. Mount the fixture high enough so that the direct light source is outside the normal line of sight of people sitting or standing in your leisure areas. Utilizing walls, eaves, or sturdy posts can help you position the light at an angle that illuminates the lawn or patio floor while keeping the bright LED chips shielded from direct view.
Furthermore, evaluate how the automatic dusk-to-dawn feature fits your lifestyle. Most solar flood lights use a built-in photocell to turn on automatically when the sun sets and turn off at sunrise. While this is highly convenient for security, it may result in unnecessary battery drain if your backyard is only used for a few hours in the evening. Check if the product manual mentions a remote control or a timer function, which allows you to turn the light off manually or set it to shut down after a specific number of hours, preserving battery life for when it is truly needed.
Installation and Environmental Prerequisites
A successful solar light installation depends heavily on the structural integrity of the mounting surface and the availability of sunlight. Before drilling any holes, inspect the wall, post, or eave where you plan to mount the fixture. The combined weight of a 200W flood light and its accompanying solar panel can be substantial, especially when subjected to strong winds during tropical storms. Ensure the mounting surface is solid wood, concrete, or brick, and avoid mounting heavy fixtures directly onto thin vinyl siding or unstable decorative panels.
The placement of the solar panel is the single most critical factor determining the performance of your light. The panel must be installed in a location that receives unobstructed, direct sunlight for the majority of the day. Avoid areas shaded by overhanging roofs, trees, or adjacent buildings, as even partial shading on a small portion of the solar panel can drastically reduce its charging efficiency. In the Philippines, positioning the solar panel to face south generally maximizes daily solar exposure throughout the year.
Always review the manufacturer’s wiring and bracket instructions before beginning the installation process. If your installation involves working at heights, such as mounting the light on a second-story eave or a tall pole, prioritize safety by using stable ladders and appropriate safety harnesses. For installations that require connecting to existing fixed electrical wiring—such as converting an old wired fixture to solar or routing cables through walls—always isolate the power supply at the circuit breaker before touching any wires. If you are uncomfortable with structural drilling, working at heights, or handling electrical components, consult a qualified professional to complete the installation safely.
Frequently Asked Questions (FAQ)
How high should I mount a 200W solar flood light?
To determine the ideal mounting height for your 200W solar flood light, always consult the manufacturer’s installation manual for their specific recommended range. Generally, high-power flood lights of this capacity perform best when mounted between 4 to 6 meters (approximately 13 to 20 feet) above the ground. Mounting the fixture within this range allows the beam angle to distribute light effectively over a broad area while maintaining a practical level of brightness on the ground surface.
Deviating from the recommended height can significantly impact the light’s performance. If you mount the light too high, the beam will spread out excessively, resulting in a dim, washed-out illumination that may not provide adequate security or visibility. Conversely, mounting the light too low concentrates the beam into an intensely bright, narrow spot that can cause severe glare and leave the surrounding areas in complete darkness. If your chosen mounting surface requires specialized masonry drilling, heavy-duty anchors, or structural reinforcement to support the fixture at the correct height, it is highly recommended to hire a qualified local technician.
Will it perform reliably during the rainy season?
The reliability of a solar flood light during the rainy season depends on its weatherproofing and the capacity of its energy storage system. First, inspect the product label to verify its Ingress Protection (IP) rating. A rating of IP65 or higher is necessary to ensure the internal electronics remain completely sealed against heavy, wind-driven rain and high tropical humidity. Lower ratings may allow moisture to seep into the casing over time, leading to corrosion and premature electrical failure.
Second, understand that solar charging efficiency is directly tied to daylight exposure. During prolonged rainy periods or overcast days, the solar panel will still collect some ambient light, but its charging rate will be significantly lower than on a clear, sunny day. This reduced charge means the battery may not reach full capacity, resulting in shorter runtimes at night. To manage this, check the user manual to see if the light features an energy-saving mode, motion-activated dimming, or adjustable brightness settings. Utilizing these features during the wet season helps conserve stored battery power, ensuring the light remains functional when solar charging is limited.

Community discussion
Share your experience or ask a question. Comments are reviewed before publication.