
Condominium living in the Philippines offers unparalleled convenience, but it often comes with a distinct architectural challenge: low ceilings. Many high-rise developments in Metro Manila, Cebu, and Davao feature solid concrete slab ceilings that sit between 2.4 and 2.6 meters high. Hanging a bulky chandelier or a long pendant light in these compact spaces can instantly make a room feel cramped, disrupt sightlines, and even pose a physical hazard for taller residents.
Choosing the right modern lamp is more than an aesthetic decision; it is a strategic way to reclaim your vertical space. Flush mount and semi-flush mount ceiling lights sit close to the ceiling plane, providing ample illumination without the physical or visual weight of hanging fixtures. By selecting low-profile designs that distribute light evenly, you can make your studio or multi-bedroom unit feel significantly more spacious, open, and airy.
Why Low Ceilings Require Specific Lighting Strategies
Standard residential construction in the Philippines often utilizes cast-in-place concrete slabs for condo ceilings. This structural design limits your ability to recess fixtures deeply unless you install a dropped gypsum ceiling, which further reduces your precious vertical clearance. When a light fixture hangs too low, it creates a visual barrier that cuts the room in half, making the walls feel as though they are closing in.
Products mentioned in this guide
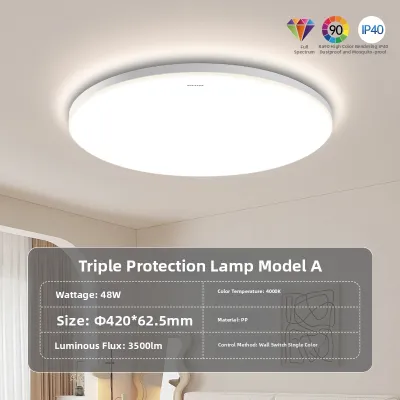
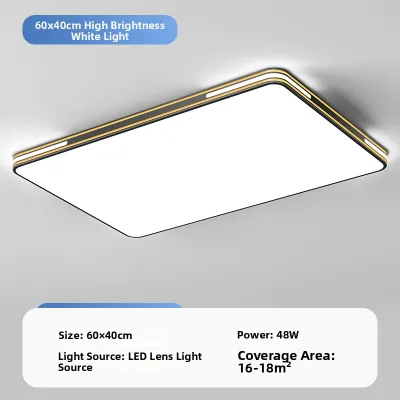
Prices are valid at publication and may change. Please refer to the product page for the latest price.
To maintain comfortable movement and a sense of openness, interior designers recommend keeping a minimum clearance of 2.1 meters (7 feet) from the floor to the bottom of any light fixture. In a condo with a 2.4-meter ceiling, this leaves you with a maximum fixture drop of only 30 centimeters (12 inches). Standard pendant lights and traditional chandeliers easily exceed this limit, leaving flush mount fixtures as the most practical and elegant solution for maintaining headroom.
Beyond physical clearance, lighting physics plays a major role in how we perceive room size. Low ceilings tend to bounce light at sharp angles, which can create harsh, pooling shadows on the floor and leave the upper corners of the room dark. A well-designed flush mount light distributes illumination outward across the ceiling plane, reflecting light downward in a soft, diffused pattern. This upward bounce of light eliminates dark corners and visually raises the ceiling, tricking the eye into perceiving a taller, more expansive room.
Essential Features to Evaluate Before Buying a Modern Lamp
Finding the perfect modern lamp for a low-ceiling condo requires balancing technical specifications with design aesthetics. Because the fixture will be positioned closer to eye level than it would be in a high-ceiling house, every detail—from the diffusion material to the driver quality—becomes highly noticeable.

Profile Height and Depth
When shopping for fixtures, always check the exact depth or projection measurement. True ultra-slim flush mounts generally have a profile height of less than 5 centimeters (2 inches), making them virtually flush with the ceiling surface. Standard flush mounts range from 5 to 12 centimeters, while semi-flush mounts drop between 12 and 30 centimeters. For hallways, walk-in closets, and low-ceiling kitchens, prioritize ultra-slim profiles to maximize clearance.
Brightness, Lumens, and Light Distribution
Do not rely solely on wattage to determine how bright a light will be, as modern LED technology produces far more light per watt than older incandescent bulbs. Instead, look at the lumen output. For a compact condo living room or bedroom, a total of 1,500 to 2,500 lumens is generally sufficient for general ambient lighting. Ensure the fixture has a wide beam angle—ideally 120 degrees or more—to prevent the light from acting like a spotlight and leaving the perimeter of the room in shadow.
Color Temperature and Spatial Perception
Color temperature, measured in Kelvin (K), heavily influences the mood and perceived size of a room. Warm white (3000K) is ideal for bedrooms and living areas, creating a cozy, inviting atmosphere. Cool white (4000K) offers a clean, energetic light that works exceptionally well in kitchens, home offices, and bathrooms. While daylight (6000K to 6500K) is highly popular in the Philippines for its high visibility, it can sometimes feel clinical in small living spaces; a cool white or warm white option often provides a more sophisticated, modern look.
Dimmability and Smart Features
Since condo rooms often serve multiple purposes—a living room might double as a workspace by day and a home theater by night—dimming capabilities are highly beneficial. Look for fixtures compatible with Triac dimmers, or opt for smart LED flush mounts that allow you to adjust both brightness and color temperature via a remote control or smartphone app. Many modern fixtures sold locally feature “tricolor” switching, allowing you to cycle between warm, cool, and daylight options simply by toggling your standard wall switch.
Material, Finish, and Humidity Resistance
In the humid, tropical climate of the Philippines, material selection is critical for product longevity. Look for flush mounts constructed from powder-coated aluminum, polycarbonate, or rust-resistant stainless steel rather than cheap ferrous metals that can corrode or bubble over time. Matte finishes (such as matte black, matte white, or brushed brass) are highly recommended because they soften light reflections and minimize glare, whereas high-gloss chrome or polished finishes can reflect harsh, distracting light points in low-ceiling spaces.
Technical and Electrical Verification
Before purchasing any ceiling fixture, verify that it is rated for the standard Philippine electrical grid of 220V to 240V at 60Hz. Many imported fixtures available on online marketplaces are designed for 110V/50Hz systems and will fail or pose a fire hazard if wired directly without a transformer. Additionally, look for local safety certifications, such as the Philippine Standard (PS) mark or the Import Commodity Clearance (ICC) sticker, to ensure the internal drivers and wiring meet national safety standards.
Best Modern Flush Mount Styles for Compact Condos
Modern lighting design has evolved far beyond the basic, uninspired dome lights of the past. Today, you can find a wide array of stylish, low-profile fixtures designed to complement contemporary interior themes while respecting the spatial limitations of condo living.
Ultra-Thin LED Panel and Disc Lights
For the ultimate space-saving solution, ultra-thin LED panel and disc lights are unmatched. These fixtures often measure less than 2 centimeters in thickness, sitting so close to the ceiling that they mimic the clean look of recessed downlights without requiring a dropped ceiling cavity. They are particularly well-suited for high-traffic zones like narrow hallways, galley kitchens, and walk-in closets where physical clearance is at an absolute premium.
When choosing an LED panel, consider the difference between edge-lit and direct-lit designs:
- Edge-lit panels place the LED chips along the frame, directing the light sideways into a light guide plate that diffuses it downward. This produces an incredibly even, glare-free glow with zero visible hot spots, making it very gentle on the eyes in low-ceiling rooms.
- Direct-lit panels position the LEDs directly behind the diffuser. While they are often more energy-efficient and brighter, they require a slightly thicker profile to allow the light to spread evenly without showing individual light points.
Geometric and Wireframe Flush Mounts
If you want to make a design statement without adding physical bulk, geometric and wireframe flush mounts are an excellent choice. These fixtures utilize open-cage structures, interlocking metal frames, or minimalist linear paths to create visual interest. By utilizing negative space, these designs allow the ceiling and surrounding walls to remain visible through the fixture, preventing the room from feeling heavy or enclosed.
Matte black geometric frames fit perfectly into industrial or modern minimalist interiors, while brushed brass or champagne gold finishes add a touch of contemporary luxury. These fixtures are ideal for dining nooks and living room centers where you want a distinct focal point. Because the bulbs are often exposed in wireframe designs, pair them with clear glass LED filament bulbs or frosted globes to prevent direct glare and maintain a comfortable ambiance.
Drum and Diffused Acrylic Flush Mounts
For private spaces like bedrooms or cozy reading corners, soft and glare-free lighting is a priority. Drum flush mounts feature a classic circular shape wrapped in modern materials like textured fabrics, frosted glass, or high-grade acrylic diffusers. The diffuser softens the light output, eliminating harsh glare when you are lying down or relaxing.
While fabric drum shades look beautiful, they can trap dust and moisture in humid tropical environments, requiring regular vacuuming. Acrylic or polycarbonate diffusers are highly practical alternatives for Philippine condos; they are lightweight, shatterproof, easy to wipe clean, and do not degrade under consistent humidity. Look for streamlined drum profiles with metallic trim accents to keep the look contemporary and polished.
How to Size and Place Fixtures in Condo Rooms
An improperly sized light fixture can throw off the entire proportion of a room. A fixture that is too small will look lost and underpowered, while one that is too large will dominate the ceiling and make the room feel claustrophobic.
To find the ideal fixture diameter for a standard square or rectangular room, you can use a classic interior design sizing formula. Start by measuring the length and width of the room in feet. Add those two numbers together, and the sum will give you the recommended fixture diameter in inches.
For example, if your condo bedroom measures 3 meters by 3 meters, that translates to roughly 10 feet by 10 feet.
$$\text{10 feet} + \text{10 feet} = \text{20 inches}$$
This means a fixture with a diameter of approximately 20 inches (or 50 centimeters) is mathematically proportional to the room. However, because low ceilings amplify the visual weight of objects, it is wise to scale this down slightly. For ceilings under 2.5 meters, reducing the calculated diameter by 10% to 20%—opting for a 40 to 45-centimeter fixture instead—will prevent the light from overwhelming the vertical plane.
In open-concept condo layouts, which are highly popular in studio and one-bedroom units, placing a single large light in the exact center of the concrete slab is rarely effective. Instead, divide the space into functional zones and place dedicated flush mounts over each area. Center one fixture directly over the living room seating arrangement (aligning it with the coffee table rather than the room center) and another over the dining table. For narrow entryways or long corridors, space out two or three smaller, matching 20-centimeter disc lights to guide movement and ensure consistent brightness without dark spots.
Installation Safety and Condo Electrical Rules
Installing ceiling fixtures in a condominium involves unique structural and administrative rules that differ from traditional house installations. Before purchasing any materials or scheduling work, check your building’s property management guidelines, as many developments require prior work permits and electrical layouts for any modifications to the ceiling.
Structural and Ceiling Material Checks
Determine whether your ceiling is solid concrete or a suspended gypsum board ceiling. Solid concrete slabs require specialized masonry anchors (such as plastic tox plugs or expansion bolts) to hold the weight of the fixture securely. Never attempt to mount a fixture directly into concrete with standard wood screws. If your condo has a suspended gypsum ceiling, ensure the fixture is anchored directly to the metal furring channels or structural studs behind the plasterboard, as drywall alone cannot support the weight of a heavy light fixture.
Electrical Compatibility and Safety Protocols
Always prioritize electrical safety. Before inspecting, removing, or installing any light fixture, turn off the main power supply at your condo’s circuit breaker panel board. Use a non-contact voltage tester to verify that the wires are completely dead before touching them. Ensure that the wire connections are secured using high-quality flame-retardant electrical tape or screw-on wire connectors, preventing loose copper strands from touching the metal housing of the fixture, which could cause a short circuit.
Professional Boundaries
While replacing an existing light fixture on a pre-installed junction box is a straightforward task, some scenarios require professional expertise. You should hire a licensed master electrician if your installation involves:
- Drilling into solid concrete ceilings where structural rebar or hidden electrical conduits might be damaged.
- Running new electrical wiring across a concrete slab, which requires installing surface-mounted metal or PVC conduits (molding) cleanly.
- Modifying your condo's main electrical panel or installing complex multi-way dimming switches.
- Working at heights on tall ladders if you are uncomfortable or lack the proper safety gear.
Frequently Asked Questions (FAQ)
Can I install a flush mount light on a concrete condo ceiling?
Yes, you can install a flush mount light on a solid concrete condo ceiling, provided there is an existing junction box cast into the concrete slab. If a junction box is present, the fixture’s mounting bracket can be screwed directly into it using appropriate machine screws. If you wish to position a light where no junction box exists, you cannot easily chisel or channel into the structural concrete slab of a high-rise building. In this scenario, you must run wiring along the surface of the concrete using neat, paintable PVC wire moldings (often called wire ducts) and secure the fixture to the ceiling using masonry anchors and tox plugs. Always consult your condo’s building administration before drilling into structural concrete, as hitting tension cables or embedded conduits can compromise building safety.
How do I clean modern flush mount lights without taking them down?
To clean your flush mount lights safely, first turn off the wall switch and allow the fixture to cool down completely to prevent thermal shock to the glass or acrylic. Use an extendable microfiber duster to remove loose dust, cobwebs, and debris from the exterior frame and diffuser. For stubborn smudges, insect spots, or kitchen grease film, lightly dampen a soft microfiber cloth with water mixed with a drop of mild dishwashing liquid; do not spray water or cleaning agents directly onto the fixture. Gently wipe the acrylic or metal surfaces, taking care not to let moisture seep into the LED driver housing or wire connections. Avoid using harsh chemical solvents, abrasive scrubbing pads, or alcohol-based cleaners, as these can strip matte finishes, degrade protective powder coatings, and cause clear acrylic diffusers to turn yellow or cloudy over time.

Community discussion
Share your experience or ask a question. Comments are reviewed before publication.