
Choosing the right kitchen light for a low-ceiling condo in the Philippines requires balancing vertical clearance, adequate task illumination, and resistance to cooking byproducts like grease and steam. In compact urban residences, where ceiling heights often hover around 2.4 meters, standard hanging fixtures can obstruct movement, interfere with tall cabinetry, and make the space feel cramped. Low-profile flush mount ceiling lights offer the ideal solution by sitting flat against the ceiling, providing broad, even illumination while keeping walkways completely clear.
To find the most suitable fixture for your kitchen, you must evaluate specific physical dimensions, moisture resistance, and electrical compatibility. This guide outlines the essential specifications, fixture styles, and safety checks needed to build a reliable shortlist for compact cooking spaces.
Why Flush Mount Fixtures Suit Low-Ceiling Kitchens
In a typical Philippine condominium, the kitchen is often integrated into an open-plan living area or tucked into a narrow entryway corridor. When ceilings are low, every centimeter of vertical clearance is highly valuable. Installing a pendant light or a low-hanging chandelier in these zones often leads to practical headaches, such as accidentally bumping your head while carrying tall items or feeling visually overwhelmed by a cluttered line of sight. Flush mount fixtures solve this by hugging the ceiling, instantly making the room feel taller and more spacious.
Products mentioned in this guide
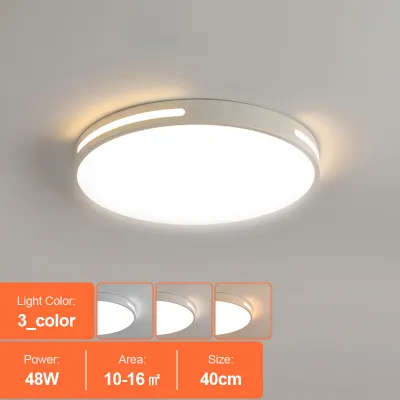
Prices are valid at publication and may change. Please refer to the product page for the latest price.
Beyond physical clearance, flush mount lights excel at distributing light evenly across a compact footprint. Unlike directional spotlights that cast harsh shadows or pendants that concentrate light in a single downward pool, a well-designed flush mount spreads ambient light laterally. This ensures that your countertops, sink, and prep areas receive balanced illumination, reducing eye strain during food preparation.
Furthermore, compact condo kitchens require smart spatial planning. Overhead cabinets, range hoods, and refrigerator doors must open fully without hitting light fixtures. A flush mount light stays entirely out of the swing path of these doors, preventing accidental damage to both your cabinetry and your lighting investment. This low-profile design also minimizes the surface area exposed to rising heat and cooking grease, which is particularly beneficial in smaller, less-ventilated cooking zones.
Essential Selection Criteria for Condo Kitchen Lights
Selecting a kitchen light involves more than just matching your interior decor; it requires verifying technical specifications to ensure safety and performance.

Profile and Diameter
Before purchasing any fixture, measure your ceiling height and the clearance above your tallest cabinet doors. For ceilings under 2.5 meters, look for a flush mount with a profile—the distance the fixture protrudes downward—of 10 centimeters or less. The diameter of the fixture should also scale with your kitchen’s footprint. A fixture that is too small will fail to illuminate the corners of your counters, while an oversized dome can visually overwhelm a narrow galley kitchen. Generally, a diameter between 30 and 40 centimeters works well for standard condo kitchens.
Brightness and Color Rendering
Kitchen tasks like chopping, measuring ingredients, and checking cooking progress require bright, high-quality light. When comparing fixtures, focus on lumen output rather than wattage, as modern LED efficiency varies widely. For a small to medium kitchen, aim for a fixture that delivers at least 1,500 to 2,000 lumens of light. Additionally, check the manufacturer’s Color Rendering Index (CRI) rating. A CRI of 80 or higher is recommended for kitchens, as it ensures that the colors of fresh ingredients, meats, and vegetables are rendered accurately, helping you judge freshness and doneness.
Moisture and Grease Resistance
Philippine cooking often involves high-heat frying, boiling, and sautéing, which releases a significant amount of steam and airborne grease. Over time, this humid, oily mixture can penetrate unsealed light fixtures, causing electrical short circuits, corroding internal components, or leaving a sticky film that dims the light. Look for fixtures with a sealed design or those explicitly rated for damp locations. Materials like tempered glass, powder-coated aluminum, and high-quality acrylic are highly recommended because they resist moisture damage and can be wiped clean easily without degrading.
Recommended Flush Mount Styles for Kitchen Spaces
Different flush mount designs offer distinct advantages depending on your ceiling height, aesthetic preferences, and maintenance habits.
Integrated LED Flush Mounts
Integrated LED fixtures are among the thinnest options available, often measuring less than 3 centimeters in thickness. These ultra-low-profile designs sit almost flush with the ceiling surface, creating a clean, minimalist look that is perfect for extremely low ceilings. Because the light source is built directly into the fixture, they distribute light exceptionally evenly without hot spots. However, before choosing this style, verify its compatibility with your existing wall switches, especially if you plan to use a dimmer. It is also important to note that when an integrated LED eventually reaches the end of its lifespan, you will generally need to replace the entire fixture rather than just a bulb.
Enclosed Glass Dome or Drum Shades
For a more traditional and highly practical option, fully enclosed glass dome or drum shades are excellent choices. These fixtures feature a solid metal base plate mounted to the ceiling, with a glass or acrylic cover that twists or screws securely into place, completely sealing the light bulbs inside. This sealed environment prevents dust, insects, and cooking grease from settling on the bulbs or internal wiring, ensuring consistent light output and reducing fire hazards. Another major benefit of this style is long-term serviceability; if a bulb burns out, you simply remove the cover and screw in a standard replacement LED bulb.
Minimal-Drop Semi-Flush Mounts
Semi-flush mount lights sit on a short stem, leaving a small gap of 5 to 10 centimeters between the ceiling and the fixture body. While they offer a beautiful aesthetic by allowing light to reflect off the ceiling surface—creating a softer, more open feel—they should be used with caution in low-ceiling kitchens. Only consider a semi-flush mount if your ceiling is at least 2.6 meters high, or if the fixture is positioned directly over a kitchen island or dining counter where foot traffic is non-existent. Ensure the gap is wide enough to clean easily, as dust and grease can accumulate quickly in the space above the fixture.
Electrical Compatibility and Installation Safety
Installing a new ceiling fixture in a Philippine condominium requires careful attention to local electrical standards and building regulations.
Voltage and Hardware Verification
The standard residential voltage in the Philippines is 220V to 240V at 60Hz. When sourcing fixtures, especially from international online marketplaces, always verify that the driver or ballast is rated for this voltage range. Connecting a 110V fixture directly to a local circuit will damage the unit and pose a serious fire hazard. Additionally, inspect your existing ceiling junction box. Ensure it is securely anchored to the ceiling structure and rated to support the weight of your chosen fixture, particularly if you are transitioning to a heavier glass dome.
Condo Association Rules
Unlike landed homes, condominium units are subject to strict property management guidelines. Many high-rise buildings feature poured concrete ceilings where drilling is strictly regulated or prohibited to avoid damaging structural steel or embedded electrical conduits. Before purchasing a fixture that requires new mounting holes or structural anchors, consult your condo’s building administration. You may need to submit a work permit or use existing mounting points to comply with building safety policies.
Professional Installation Boundaries
While replacing an existing light fixture on a like-for-like basis can be a straightforward task for a confident DIY enthusiast, safety must always come first. Always isolate the power at the main circuit breaker before touching any wiring, and use a reliable voltage tester to confirm the circuit is dead. If your installation requires running new electrical lines, installing a dimmer switch, modifying concrete ceilings, or handling complex smart home wiring, stop and hire a licensed electrician. Professional installation ensures compliance with the Philippine Electrical Code and protects your property investment.
Cleaning and Maintenance in a Grease-Prone Environment
A kitchen light fixture is constantly exposed to airborne oils, steam, and dust. Regular maintenance is essential to preserve both the light output and the lifespan of the fixture.
Routine Wiping Schedules
Do not wait for a thick layer of grime to build up before cleaning your kitchen light. Establish a routine wiping schedule—ideally once every month—to remove light grease films before they bake onto the surface from the heat of the fixture. A clean diffuser can improve light transmission significantly, keeping your workspace bright and safe.
Safe Cleaning Agents and Methods
Before cleaning, always turn off the light switch and isolate the power at the circuit breaker. Allow the fixture and bulbs to cool completely to prevent thermal shock, which can crack glass covers. Remove the glass or acrylic diffuser if possible. Wash it in a sink using warm water and a few drops of mild dishwashing liquid, which is highly effective at breaking down cooking grease. Avoid using abrasive scrubbing pads, steel wool, or harsh chemical solvents like acetone or ammonia, as these can scratch acrylic, strip protective coatings from metal bases, or cloud glass surfaces. Wipe the ceiling-mounted base gently with a dry or slightly damp microfiber cloth, ensuring no moisture enters the electrical sockets.
Regular Safety Inspections
While cleaning, take a moment to inspect the physical condition of the fixture. Look for signs of heat discoloration on the sockets or wiring, which could indicate that the bulbs exceed the fixture’s maximum wattage rating. Check for loose mounting screws, worn-out rubber gaskets, or signs of moisture ingress. If you notice persistent flickering, buzzing sounds, or delayed turn-on times, consult a professional electrician to inspect the wiring or replace the internal LED driver.
Frequently Asked Questions (FAQ)
Can I use a flush mount light directly above a gas stove?
Installing a flush mount light directly above a gas stove is generally not recommended unless it is positioned high enough to escape direct heat plumes and is paired with an active range hood. Gas burners release intense heat, moisture, and combustion byproducts that rise directly upward. If a fixture is placed in this path without sufficient clearance, the extreme heat can degrade plastic diffusers, melt wire insulation, and shorten the lifespan of LED drivers. Always maintain the manufacturer-recommended clearance distances and ensure your range hood is operating to divert heat and grease away from the ceiling.
How do I know if my condo ceiling can support a heavier glass flush mount?
To determine if your ceiling can support a heavy glass fixture, you must inspect the junction box inside the ceiling cavity. Turn off the power, remove your existing fixture, and look for a weight rating stamped on the metal or plastic junction box. Standard plastic boxes are typically rated for fixtures weighing up to 11 kilograms, while heavy-duty metal boxes can support more. If your condo has a suspended gypsum or drywall ceiling, the fixture must be anchored directly to the metal framing channels rather than the drywall sheet alone. For concrete ceilings, consult your building’s maintenance office to verify if expansion bolts can be safely installed.
Are smart flush mount lights practical for a small condo kitchen?
Smart flush mount lights can be highly practical in a compact condo kitchen, especially if the space serves multiple purposes. Many smart fixtures allow you to adjust both brightness and color temperature. You can set a bright, cool white light (around 4000K to 5000K) for safe food preparation and chopping, and then transition to a dim, warm white light (around 2700K to 3000K) for a relaxed dining atmosphere in the evening. However, ensure your condo’s Wi-Fi signal is strong enough to reach the kitchen, as thick concrete walls can sometimes block wireless signals. If connection reliability is a concern, consider using smart bulbs with a dedicated physical remote or a compatible smart wall switch.

Community discussion
Share your experience or ask a question. Comments are reviewed before publication.