
Installing an aluminum LED profile in your condo is an excellent way to achieve a clean, modern, and professional lighting look. This process involves measuring your space, cutting the rigid aluminum channel to size, mounting it securely to your ceiling, wall, or cabinetry, and then laying down the LED strip before snapping on a protective diffuser cover. By housing your LED strips inside a dedicated profile, you protect the delicate circuitry from dust and tropical humidity while eliminating harsh glare and visible hotspots on reflective condo surfaces like polished tiles or glossy kitchen cabinets.
Condo units in the Philippines often present unique installation challenges, such as solid concrete walls, gypsum drop ceilings, or compact cove lighting spaces. Navigating these surfaces requires choosing the right mounting hardware and understanding when to use mechanical fasteners versus high-strength adhesives. Whether you are highlighting a kitchen backsplash, creating a soft glow in your bedroom cove, or adding accent lighting under your living room shelves, following a systematic installation process ensures a safe, durable, and visually seamless result.
Tools and Materials You Will Need
To complete this installation successfully, you must gather the correct materials and tools before making any cuts or electrical connections. The core component is the aluminum profile itself, which typically comes in standard one-meter or two-meter lengths and includes a matching polycarbonate diffuser cover, end caps, and mounting clips. You will also need your chosen LED strip light, ensuring its width is compatible with the inner channel of the profile, and a suitable low-voltage power supply that matches the strip’s voltage and wattage requirements.
Products mentioned in this guide
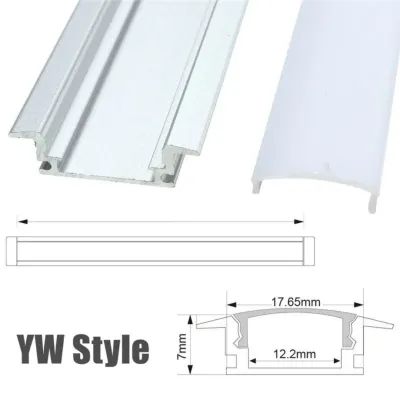
Prices are valid at publication and may change. Please refer to the product page for the latest price.
For cutting and measuring, keep a reliable tape measure and a fine-tipped marker close at hand to mark your dimensions accurately. A fine-toothed hacksaw or a specialized aluminum miter saw is necessary to slice through the metal channel without bending or warping the thin walls. A small metal file or medium-grit sandpaper is also essential to smooth down any sharp burrs left behind after cutting, protecting both your hands and the delicate LED strip from damage.
Safety and electrical preparation require a few basic tools to ensure a secure setup. A reliable voltage tester is indispensable for verifying that power lines are completely dead before you work near any existing wiring. Wire strippers, electrical tape, and solderless snap connectors or terminal blocks will help you make clean, insulated connections. If you plan to mount the profile on concrete or masonry walls, you will also need a rotary drill, masonry drill bits, and appropriate wall plugs, whereas lightweight installations on wooden cabinets or smooth laminates might only require high-strength, heat-resistant double-sided mounting tape.
Step 1: Measure and Cut the Aluminum Profile
Accurate measurement is the foundation of a clean installation, especially in the tight corners and precise alcoves of a modern condo. Begin by measuring the exact length of the surface where the profile will be mounted using your tape measure. If you are installing the profile in a continuous run that spans multiple walls, remember to subtract a few millimeters to account for the thickness of the end caps and any corner connectors you plan to use. Mark the measurement directly onto the aluminum channel and the polycarbonate diffuser cover using your fine-tipped marker, keeping the diffuser snapped into the profile during marking to ensure both pieces align accurately.

When you are ready to cut, it is highly recommended to keep the plastic diffuser cover fully inserted inside the aluminum profile. Cutting both pieces simultaneously prevents the thin aluminum walls from deforming under the pressure of the saw and stops the plastic diffuser from cracking or chipping at the edges. Secure the profile firmly to a workbench or a stable surface using a clamp, protecting the metal finish with a soft cloth or cardboard scrap placed under the clamp’s jaws.
Using a fine-toothed hacksaw, make slow, steady strokes along your marked line without applying excessive downward force. Let the teeth of the blade do the work to avoid bending the channel or creating jagged edges. Once the cut is complete, separate the diffuser from the aluminum channel and inspect the cut ends. Use a metal file or sandpaper to gently smooth the rough edges and remove any sharp metal burrs, as these burrs can easily slice through the protective backing of your LED strip or cut your fingers during assembly. Finally, blow or wipe away all aluminum shavings from inside the channel to prevent them from causing electrical shorts or casting shadows under the LED strip.
Step 2: Prepare and Test the LED Strip Wiring
Before permanently mounting your aluminum profile or sticking down the LED strip, you must verify that all electrical components are fully functional and compatible. Check the manufacturer labels on your LED strip, power supply, and any dimmers or controllers to ensure their voltages match, typically 12V or 24V DC. Connecting a low-voltage strip directly to a standard 220V Philippine wall outlet without a compatible step-down transformer will instantly destroy the strip and pose a severe safety hazard.
Unroll the LED strip completely from its plastic reel before turning it on, as leaving it coiled while powered can cause rapid heat buildup and damage the light-emitting diodes. Connect the strip to the power supply using secure solderless connectors or terminal blocks, paying close attention to the positive (+) and negative (-) polarity markings on both the wire and the strip. Plug the power supply into a temporary outlet to test the entire length of the strip, checking that every single LED illuminates uniformly and that there is no flickering, dimming, or color inconsistency.
If your condo lighting plan involves connecting multiple LED strips in a long run, verify that the total wattage of the combined strips does not exceed the rated capacity of your power supply. A good safety practice is to choose a power supply with a wattage rating at least twenty percent higher than the total wattage of your LED strips to prevent overheating and prolong the lifespan of the driver. If you discover that your installation requires modifying your condo’s fixed electrical wiring, installing a new wall switch, or tapping directly into a main circuit breaker panel, stop immediately and consult a qualified, licensed electrician to ensure compliance with local electrical codes and building safety regulations.
Step 3: Securely Mount the Profile to Your Condo Surfaces
Mounting your aluminum profile securely requires selecting the right method for the specific surface material in your condo. For concrete ceilings, structural beams, or heavy-duty installations, mechanical mounting clips secured with screws and wall plugs are the safest option. Hold the mounting clips against the surface, mark the screw holes, and use a drill with a masonry bit to create the pilot holes before tapping in the plastic wall plugs. Screw the clips tightly into place, ensuring they are precisely aligned along a straight line so the aluminum profile can snap into them without twisting or bending.
If you are mounting the profile under kitchen cabinets, inside wooden wardrobes, or on smooth, lightweight surfaces where drilling is not ideal, high-strength double-sided mounting tape is a highly effective alternative. Before applying any adhesive, you must clean the mounting surface thoroughly with isopropyl alcohol to remove all grease, dust, and moisture, which are common in humid tropical environments. Allow the surface to dry completely, apply the tape firmly to the back of the aluminum profile, and press the profile against the surface with steady, even pressure for at least thirty seconds to establish a strong bond.
Safety must always be your top priority when working near any electrical infrastructure in your condo. If you are mounting profiles close to existing light fixtures, ceiling junction boxes, or wall outlets, locate your condo’s main electrical panel and turn off the circuit breaker for that specific zone. Use your voltage tester to verify that the wires are completely dead before proceeding with any physical installation. Working at heights, such as on high ceilings or deep coves, requires a stable step ladder and, ideally, a second person to assist you in holding the long aluminum profiles steady while you secure them.
Step 4: Insert the LED Strip and Snap on the Diffuser
With the aluminum profile securely mounted, you can now install the LED strip light inside the channel. Begin by wiping the inside of the aluminum profile with a dry microfiber cloth to remove any remaining dust or debris that could prevent the adhesive backing from sticking. Carefully peel away a small section of the adhesive backing from the start of the LED strip, align it with the end of the profile, and press it firmly into the center of the channel.
Slowly work your way down the length of the profile, peeling the backing and pressing the strip flat as you go. Avoid stretching, pulling, or twisting the LED strip, as this can damage the delicate copper traces inside the flexible circuit board. If the strip is slightly longer than your aluminum profile, locate the designated cut lines marked with a scissor icon on the strip and cut only along those lines; cutting anywhere else will permanently disable a section of the lights.
Once the strip is flat and secure, it is time to install the polycarbonate diffuser cover. Align one end of the diffuser with the start of the aluminum profile and gently press down until you hear it click or snap into the channel’s grooves. Slide your fingers along the length of the diffuser, applying gentle, even downward pressure to snap the entire cover into place. Finally, slide the plastic end caps onto both ends of the profile to seal the system, ensuring that the end cap with a hole is positioned where the power wires exit the channel to prevent pinching or damaging the insulation.
Step 5: Final Testing and Routine Maintenance
The final step of your installation is to conduct a thorough system check and establish a simple maintenance routine to keep your lights looking pristine. Restore power at your condo’s main circuit breaker and turn on your new LED setup. Walk along the length of the profile to inspect the light output, verifying that the diffuser is successfully eliminating hotspots and creating a smooth, continuous glow. Check for any dark spots, which could indicate a loose connection or a damaged section of the LED strip, and ensure the profile remains firmly attached to the surface without sagging or wobbling.
Because condos in tropical climates can experience high humidity and dust accumulation, routine maintenance is essential to preserve the brightness and efficiency of your lights. Periodically dust the exterior of the polycarbonate diffuser using a clean, dry microfiber cloth to prevent dirt buildup from dimming the light output. Avoid using harsh chemical cleaners, alcohol-based sprays, or abrasive scrubbing pads on the diffuser, as these can scratch or cloud the plastic, permanently degrading the quality of the light.
If you ever need to clean the aluminum housing or address an internal issue, always turn off the power at the wall switch or unplug the power supply first. Never spray water or liquid cleaners directly onto or near the LED profile, even if it is sealed with end caps. By keeping the installation dry, clean, and free of dust, your aluminum LED profile will continue to provide beautiful, reliable ambient lighting for your condo for years to come.
Frequently Asked Questions (FAQ)
Can I bend or install an aluminum profile on a curved surface?
Standard rigid aluminum profiles are designed strictly for straight-line installations and cannot be bent or curved without permanently deforming, cracking, or breaking the metal and the plastic diffuser. If your condo features curved walls, rounded pillars, or arched coves, you should look for specialized flexible aluminum profiles or bendable silicone channels designed specifically for curved surfaces. Alternatively, you can create angled runs on flat surfaces by cutting standard profiles at precise 45-degree angles using a miter box, allowing you to wrap the lighting cleanly around sharp corners.
Do I need a professional electrician for condo LED installations?
Whether you need a professional electrician depends entirely on how your LED system receives its power. If you are using a low-voltage, plug-and-play LED strip kit that plugs directly into an existing wall outlet via a standard power adapter, the installation is completely safe for a DIY project. However, if your design requires hardwiring the power supply directly into your condo’s 220V electrical system, running new wires behind concrete walls, or installing new switches and ceiling junction boxes, you must hire a licensed professional electrician to handle the electrical connections safely and comply with local building codes.

Community discussion
Share your experience or ask a question. Comments are reviewed before publication.