
Making your own container candles at home is a rewarding craft that combines chemistry, design, and sensory art. By melting raw wax, securing a wick, and blending custom fragrances into a heat-safe vessel, you can create beautiful, functional decor pieces that elevate the ambiance of any room. Whether you want to craft personalized gifts or establish a relaxing atmosphere in your living space, mastering the basics of candle making allows you to control exactly what goes into your candles. This step-by-step guide walks you through the entire process, from selecting the right raw materials to troubleshooting common visual flaws, ensuring your homemade candles burn safely and beautifully.
Starting a candle-making hobby can be highly cost-effective, with basic starter materials costing around ₱1,500 to ₱3,000 depending on the quality of the ingredients. By learning the proper techniques, you can avoid common pitfalls like uneven burning, soot buildup, or weak scent throw. With a little patience and attention to detail, you will soon be pouring candles that rival commercial alternatives.
Essential Supplies for Making Container Candles
Selecting the right wax is the foundation of a successful candle. Soy wax is popular among beginners because it is biodegradable, burns cleanly, and cleans up easily. Paraffin wax is a traditional option known for its strong fragrance throw, though it is petroleum-based and can produce soot if not maintained. Beeswax offers a natural, sweet aroma and a long burn time, but its high melting point can make it challenging to blend with delicate fragrance oils. Coconut wax is a softer, slow-burning alternative that is frequently blended with soy or paraffin to improve scent throw and surface smoothness. Always check the wax manufacturer’s specifications for melting points and maximum fragrance load capacities before purchasing.
Products mentioned in this guide
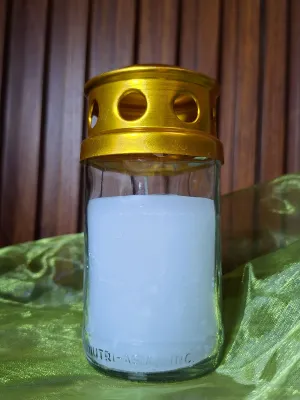
87 Lazada user ratings
delivered fast, packed and in good condition and no broken glass. perfect for outdoor used specially in cemetery,, i hope it won't rain. not…Read full reviewShow less
delivered fast, packed and in good condition and no broken glass. perfect for outdoor used specially in cemetery,, i hope it won't rain. not a scented candle.
very well packed with bubble wrapped na makapal and karton pa din inside even naka box pa sya. no damage 4pcs. Thank you so much will order …Read full reviewShow less
very well packed with bubble wrapped na makapal and karton pa din inside even naka box pa sya. no damage 4pcs. Thank you so much will order again.
nice ang quality magaganda ang design super secured pa ang pag kakapack ni seller kaya mas nagustuhan ko nice seller
Received the item very safely , no cracks or damage and super love how they packed each candles. Gonna buy again .
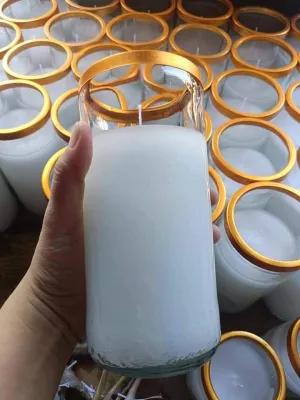
313 Lazada user ratings
Glass bottled candle holder, No scent for a calm atmosphere,Mabilis Rin Ang shipping,maganda,secured at safe Rin Ang packaging..will order a…Read full reviewShow less
Glass bottled candle holder, No scent for a calm atmosphere,Mabilis Rin Ang shipping,maganda,secured at safe Rin Ang packaging..will order again soon.Thank you seller,Lazada & del rider.
💰Price:affordable 🌸Scent:good ⏳Burn Time:good Ideal for meditation, No scent added, Burns up to 96-120 hours, Simple plain pattern
worth the price long lasting, simple design scentless take 5 days bago maubos...thanks seller, rider and lazada...
💰Price:affordable for a long hours of light. 🎨Design:luxuruous design for its gold lining in the top of the glass
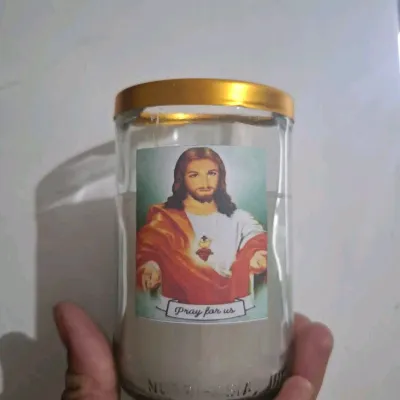
422 Lazada user ratings
good sya kc wlang basag... bad kc 2 to 3 weeks ko ata syang inantay bsta may katagalan po bago dumating. bad kc may nkalagay na pagpipilian …Read full reviewShow less
good sya kc wlang basag... bad kc 2 to 3 weeks ko ata syang inantay bsta may katagalan po bago dumating. bad kc may nkalagay na pagpipilian pero d nmn nasusunod un lng tnx din po sa rider....
Smokeless and long-lasting, Religious style design, Religious-themed design, 🎨Design:sana may choices pa na Mama Mary at family
💰Price:cheaper compared to others 🌸Scent:unscented 🎨Design:typical, simple, plain white candle with sticker of Jesus
Bulk order available, Custom stickers available, Unscented wax material, Smokeless and long-lasting,
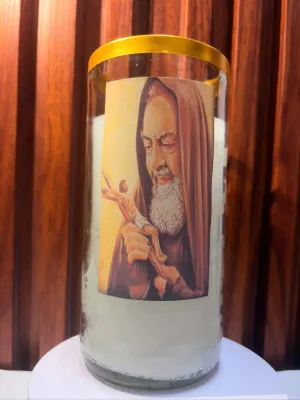
282 Lazada user ratings
Proven smokeless formula, safe dumating at maayos kausap si seller, maganda at malaki plus mura pa at the same time snaa smokeless talaga sy…Read full reviewShow less
Proven smokeless formula, safe dumating at maayos kausap si seller, maganda at malaki plus mura pa at the same time snaa smokeless talaga sya
Proven smokeless formula, scent is pleasant.price is reasonable cheaper than the supermarket.
Nakuha ko na order ko complete naman,diko pa.na open natsek kung kumpleto..mamnajsjjsjsjsjsn
☑️Mabigat ✅Malaki Yung 500 sakin yun
Prices are valid at publication and may change. Please refer to the product page for the latest price.
Wick selection is critical to how your candle burns and disperses fragrance. Cotton wicks braided with paper or zinc cores are standard, reliable options that provide a steady flame. Wooden wicks are also popular for their unique aesthetic and soothing crackling sound, though they require careful trimming. The size of the wick must match the inner diameter of your chosen container. A wick that is too small will cause “tunneling,” where the flame burns down the center of the candle and leaves a thick ring of hard wax along the container walls. Conversely, a wick that is too large will produce an excessively large, smoky flame that creates soot. Consult a wick sizing chart from your supplier to match the wick to your container’s exact diameter.
While container shape or color is a matter of personal preference, the material and structural integrity are critical safety factors. Glass jars, metal tins, and glazed ceramic vessels are excellent choices because they are non-porous and withstand the heat of molten wax and a burning flame. Avoid unglazed clay, wood, plastic, or porous containers, which can leak, absorb fragrance, or catch fire. Always inspect containers for hairline cracks or chips before use; pouring hot wax into a compromised vessel can cause it to shatter instantly.
To complete your setup, gather a few specialized tools. A double boiler setup is essential to melt wax safely; never melt wax directly over an open flame or hot plate due to fire hazards. You will also need a heat-resistant pouring pitcher, an accurate digital kitchen scale to weigh ingredients, and a reliable thermometer. Finally, obtain wick stickers or high-temperature glue to secure the wick to the container’s bottom, along with centering tools to keep the wick upright while the wax cools.
Step-by-Step Guide to Melting and Pouring Wax
Before melting wax, prepare your containers. Clean and dry each vessel thoroughly, as dust or moisture can prevent the wax from adhering properly to the walls. Place a wick sticker or high-temperature glue onto the metal tab at the base of your wick, then press it firmly into the exact center of the container’s bottom. Slide a wick centering tool across the top of the container, pulling the wick taut to keep it perfectly vertical during pouring and cooling.

Next, calculate the amount of wax needed. A reliable formula is to multiply the liquid volume of your container by the number of candles you are making, then multiply that total by 0.86 to find the weight of solid wax flakes required. Weigh the flakes on your digital scale. Set up your double boiler by filling a pot with 2 to 3 inches of water and placing your pouring pitcher inside. Heat the water over medium-low heat to melt the wax gently, stirring occasionally. Use your thermometer to ensure the wax does not exceed the manufacturer’s recommended maximum temperature, typically around 85°C to 90°C.
Once the wax reaches the manufacturer’s recommended temperature for fragrance binding—usually 80°C to 85°C—remove the pitcher from the heat. Weigh your fragrance oil using a ratio of 6% to 10% of the wax weight. Slowly pour the fragrance oil into the molten wax, along with any candle dyes. Stir the mixture gently but continuously for a full two minutes. This thorough stirring ensures that the fragrance oil molecules fully bind with the wax, preventing the oil from settling at the bottom or sweating out later.
Allow the scented wax to cool to its optimal pouring temperature, typically between 55°C and 65°C for soy wax. Pouring at the correct temperature minimizes shrinkage and surface imperfections. Slowly pour the wax into your prepared containers, keeping the stream steady and close to the vessel to avoid creating air bubbles. Leave about 1 to 1.5 centimeters of headspace at the top to allow room for the flame and prevent overflows. Save a small amount of leftover wax in your pitcher to fix any surface flaws later.
Curing, Testing, and Troubleshooting Common Mistakes
Once poured, let your candles cure undisturbed on a flat surface in a room with a consistent temperature, away from drafts and direct sunlight. While the wax looks solid within hours, curing allows the fragrance and wax molecules to fully bind. For soy wax, a cure time of 7 to 14 days is recommended to achieve optimal scent throw, while paraffin candles generally require 24 to 48 hours. Rushing this process can result in a weak scent throw when burned.
Before lighting your candle, trim the wick to approximately 5 millimeters, or the manufacturer’s recommended length. A wick that is too long will bend, produce an unstable flame, and release black soot. Keep the wick trimmed to this length before every burn to ensure a clean, controlled flame.
Beginners often encounter surface imperfections. “Sinkholes” are deep cavities that form around the wick as the wax shrinks, while “frosting” is a white, crystalline appearance natural to soy wax. “Wet spots” occur when wax pulls away from glass due to temperature changes. To fix these issues, use a craft heat gun on its lowest setting. Gently sweep the hot air over the candle’s surface to melt a thin layer of wax, which will cool into a smooth, even finish.
Perform a test burn once curing is complete. Let the candle burn for one hour per inch of container diameter and observe the melt pool. If the wax does not melt to the edges (tunneling), your wick is too small. If the flame flickers wildly, produces soot, or creates a deep melt pool quickly, your wick is too large. Take notes and adjust your wick selection for future batches.
Safety Tips and Workspace Setup for Candle Making
Establishing a safe workspace is essential when working with hot wax and open flames. Choose a clean, flat, well-ventilated area free from drafts. Cover your work surface with old newspapers, parchment paper, or silicone mats to catch accidental drips. Ensure your workspace is far away from curtains, loose papers, or overhead wooden cabinets.
Wear heat-resistant gloves when handling the hot pouring pitcher, and wear safety glasses to guard against splashes. Keep a box of baking soda or a Class B fire extinguisher nearby. Never use water to extinguish a wax fire, as it causes the hot wax to splatter violently and spread the flames.
Never leave melting wax unattended. Wax has a flash point at which it can ignite spontaneously, so always monitor the temperature with a thermometer. Keep children, pets, and bystanders completely away from the active candle-making area.
If you spill wax, do not wipe it up while liquid, as this can spread the mess and cause burns. Allow the spill to cool and solidify completely. Once hard, gently scrape it off using a plastic scraper or dull spatula, then clean any remaining residue with warm, soapy water or rubbing alcohol.
Frequently Asked Questions (FAQ)
Can I reuse old candle wax for new container candles?
Yes, you can reuse old candle wax, but it requires careful preparation and carries some performance risks. First, melt the leftover wax gently and pour it through a fine mesh strainer or cheesecloth to filter out old wicks, soot, dust, and other debris. Keep in mind that mixing different wax types (such as soy and paraffin) or blending old, partially evaporated fragrances can lead to unpredictable burn rates, poor scent throw, or excessive smoking. If the reclaimed wax is heavily contaminated, discolored, or has a burnt smell, it is best to discard it safely rather than attempting to make a new candle with it.
Why does my homemade candle have no scent throw?
A weak scent throw is usually caused by temperature or ratio issues during the mixing phase. If you add fragrance oil when the wax is too hot, the fragrance can evaporate into the air before the wax cools. If the wax is too cool, the oil will not bind properly and may pool at the bottom. Ensure you add fragrance at the exact temperature recommended by the wax supplier (usually 80°C–85°C) and stir gently for two minutes. Additionally, verify that your fragrance load is within the recommended 6% to 10% range and allow the candle to cure fully (especially soy wax, which needs at least a week) before lighting.

Community discussion
Share your experience or ask a question. Comments are reviewed before publication.