
Replacing an old ceiling light with a modern, energy-efficient LED panel is an excellent way to brighten your living space, but the success of the project depends entirely on getting the physical dimensions right. Many homeowners make the mistake of measuring only the visible outer frame of their existing light fixture, only to find that the replacement unit does not fit into the ceiling opening. To ensure a seamless installation without the need for messy and expensive ceiling reconstruction, you must measure the hidden structural opening—known as the ceiling cutout.
Before attempting to handle any electrical fixture or climb a ladder, safety must be your absolute priority. Always turn off the power supply to the lighting circuit at your home’s main circuit breaker or consumer unit, rather than relying solely on the wall switch. This step-by-step guide will walk you through the precise process of measuring your ceiling cutout, understanding how product dimensions correspond to your ceiling hole, and verifying both structural and electrical compatibility to help you select the perfect replacement LED panel.
Essential Tools for Safe and Accurate Measurement
To complete this task safely and obtain precise measurements, you will need to gather a few basic tools before starting any physical work. Working overhead requires stability, so a sturdy step ladder that allows you to comfortably reach the ceiling without stretching is indispensable. Avoid standing on unstable household furniture like chairs or tables, which can easily tip over on typical tiled or polished concrete floors.
Products mentioned in this guide
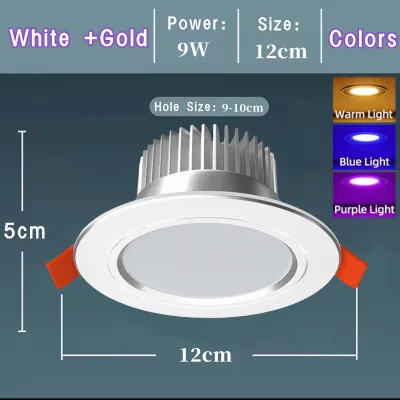
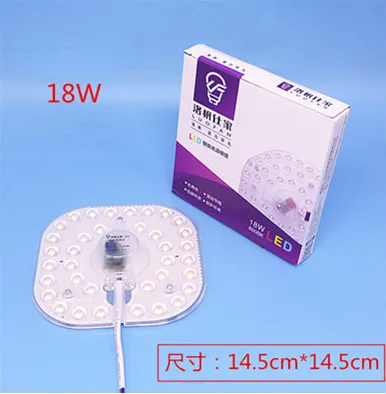
Prices are valid at publication and may change. Please refer to the product page for the latest price.
For the actual measurements, a high-quality steel measuring tape is preferred over soft fabric tapes, as steel remains rigid when extended across an open ceiling cavity. You will also need a reliable non-contact voltage tester to verify that the electrical wires are completely dead before you touch them. Because ceiling cavities are dark and often accumulate dust, insects, or loose insulation over time, keep a bright flashlight, a protective dust mask, and safety glasses nearby to protect your eyes and lungs while working. Finally, have a notepad or a smartphone ready to record your measurements immediately so you do not have to rely on memory when shopping for your replacement fixture.
Step-by-Step Guide to Measuring Your Ceiling Cutout
Measuring a ceiling cutout requires exposing the raw opening behind your current light fixture. Begin by isolating the power at the main breaker panel. Once the breaker is switched off, use your non-contact voltage tester near the switch and around the edge of the light fixture to confirm that no electrical current is flowing to the unit. Only after verifying that the circuit is completely dead should you proceed to loosen the mounting screws or release the spring clips holding the existing fixture in place. Carefully lower the old light, taking care not to pull or strain the connected wires, and disconnect them according to the manufacturer’s instructions or safety guidelines.

With the old fixture removed, you will see the raw edge of the ceiling board. If you are replacing a square or rectangular panel, use your steel measuring tape to measure the length and width of the cutout. Take these measurements at multiple points—such as the left side, the right side, the top, and the bottom. Ceiling cutouts, especially those cut by hand in gypsum, plywood, or fiber cement boards, are rarely perfectly square or uniform. If you find discrepancies between your measurements, always use the smallest recorded dimension as your baseline to ensure the new panel will fit into the tightest part of the opening. For round fixtures, measure the diameter of the hole across its widest point at two different angles to account for any warping or irregularity.
Next, you must measure the ceiling cavity depth. Insert your measuring tape straight up into the hole until it touches the floor structure above, a roof beam, or any physical barrier. Note this distance from the bottom surface of the ceiling board to the lowest obstruction above. LED panels require a certain amount of clearance not just for the thin panel itself, but also for the external LED driver, wiring connections, and proper heat dissipation. If your ceiling cavity is too shallow, a standard recessed panel may not sit flush against the ceiling.
While measuring the depth, use your flashlight to inspect the interior of the ceiling cavity for any hidden obstructions. Look closely for wooden ceiling joists, metal suspension tracks, air conditioning ducts, or existing electrical conduits that run close to the cutout. These structural elements cannot be easily moved and will restrict the space available for your new light. If a joist or metal channel runs directly across or adjacent to the opening, it will limit the depth and width of the fixture you can install, meaning you must choose an ultra-thin panel or adjust your placement strategy.
Understanding LED Panel Dimensions: Cutout Size vs. Faceplate Size
One of the most common errors when purchasing a ceiling light led replacement is confusing the nominal size of the fixture with its actual installation dimensions. When browsing product catalogs or retail shelves, you will encounter two distinct measurements: the cutout size and the faceplate (or trim) size. Understanding the difference between these two specifications is critical to avoiding a costly purchasing mistake.
The cutout size refers to the exact dimensions of the physical hole that must exist in your ceiling board for the body of the light to pass through. The faceplate or trim size, on the other hand, represents the outer dimensions of the visible frame that sits flat against the underside of your ceiling. The faceplate is always larger than the cutout size. This design allows the outer flange of the light to rest securely on the ceiling surface, supporting the fixture while completely covering the raw, uneven edges of the cutout for a clean, professional finish.
When selecting a replacement LED panel, you must match your measured ceiling hole to the manufacturer’s specified cutout dimensions, not the overall faceplate dimensions. If you purchase a panel based solely on the faceplate size, the recessed housing of the light will likely be too large to fit into your existing ceiling hole, forcing you to cut and widen the ceiling board. Conversely, if the faceplate of the new light is smaller than your existing cutout, the fixture will slip right through the hole or leave unsightly gaps around the edges. Always locate the detailed specification sheet on the product packaging or manufacturer’s website to verify the precise cutout requirements before buying.
Verifying Electrical and Structural Compatibility
Finding a panel that physically fits the ceiling hole is only half the battle; you must also ensure that the replacement light is electrically and structurally compatible with your home’s infrastructure. In the Philippines, residential electrical systems typically operate on a nominal voltage of 220V at a frequency of 60Hz. When purchasing a new LED panel, verify that the driver and fixture are rated for this specific voltage range and frequency to prevent premature driver failure, flickering, or safety hazards. Additionally, check the wattage limit of your existing lighting circuit to ensure that adding the new panel will not overload the system, though modern LED replacements generally draw significantly less power than older fluorescent or halogen fixtures.
Next, examine the wiring configuration inside your ceiling cavity. Determine whether your existing setup uses a direct-wire connection to a junction box or if it utilizes a plug-in driver system. The junction box must be accessible, dry, and in good physical condition, free from signs of overheating or moisture damage. If your home is located in a high-humidity tropical region, moisture accumulation in ceiling cavities can degrade electrical connections and cause corrosion. Ensure that all wire splices are securely joined inside an approved junction box using proper wire connectors or terminal blocks, rather than loose electrical tape.
You must also assess the structural integrity of your ceiling material. Residential ceilings are commonly constructed from gypsum board, plywood, or PVC panels. Each material has different load-bearing capacities and structural behaviors. Gypsum board and thin plywood can become brittle or soft over time when exposed to high humidity, which may cause the mounting clips of a heavy LED panel to damage or tear through the ceiling material. Ensure the ceiling board is thick and sturdy enough to support the weight of the new fixture and that the spring-loaded mounting clips will grip the board securely without causing cracking or sagging.
Solutions When Your Cutout Doesn't Match Available Panels
If your measurements reveal that your existing ceiling cutout does not match any standard, off-the-shelf LED panel sizes, you do not necessarily have to undertake a major ceiling renovation. There are several practical solutions available to bridge the gap between non-standard holes and standard fixtures. One effective method is using adapter brackets, conversion plates, or reducer rings. These accessories are designed to mount over a larger, pre-existing ceiling hole, providing a secure, downsized opening into which a smaller, standard-sized LED panel can be safely clipped. This approach hides the oversized hole completely without requiring plastering or painting.
If you find that your ceiling cavity is too shallow, heavily obstructed by joists, or structurally compromised, a recessed LED panel may not be viable. In such cases, switching to a surface-mounted LED panel is an excellent alternative. Surface-mounted panels do not require a deep cutout; instead, they attach directly to a mounting bracket screwed into the ceiling surface, requiring only a tiny hole for the electrical wiring to pass through. This completely bypasses the issue of cavity depth and structural obstructions while still providing the clean, modern aesthetic of a flat panel light.
However, there are clear limits to what can be accomplished as a DIY project. If your replacement requires physically enlarging a cutout in a concrete ceiling, reinforcing a sagging ceiling structure, rerouting major electrical conduits, or installing new dedicated circuits, you have reached a critical stop condition. In these scenarios, attempting to proceed without professional expertise can compromise your home’s structural safety or violate local electrical codes. Always consult a qualified, licensed electrician or a structural professional to handle complex modifications safely.
Frequently Asked Questions (FAQ)
Can I replace a traditional recessed downlight with a flat LED panel?
Yes, you can replace a traditional recessed downlight with a flat LED panel, but you must address the differences in shape and size. Traditional downlights typically require smaller, circular cutouts, whereas flat LED panels are often larger and square or rectangular. If you want to install a square panel, you will need to carefully mark and cut the ceiling board to expand the circular hole into the required square shape. Alternatively, if you prefer to avoid cutting, you can look for round LED panels designed to fit standard downlight cutout diameters, or use specialized adapter plates that cover the larger existing opening while providing a mounting point for the new panel.
Do I need a licensed electrician to replace a ceiling LED panel?
For simple, like-for-like replacements where you are connecting a plug-and-play LED panel to an existing, compatible driver and connector, a confident homeowner can often perform the swap safely by following the manufacturer’s instructions and isolating the power. However, if the replacement involves hardwiring a new LED driver to the mains, modifying or installing a junction box, running new electrical cables, or altering the structural framing of your ceiling, you must hire a licensed electrician. Working with fixed electrical wiring carries significant risks of shock and fire, and professional installation ensures compliance with local safety standards and electrical codes.

Community discussion
Share your experience or ask a question. Comments are reviewed before publication.