
Selecting a suitable modern flush mount light for a low-ceiling condo dining area in the Philippines requires balancing physical clearance, light distribution, and electrical safety. In typical high-rise residential units where ceiling heights often range from 2.4 to 2.7 meters, traditional hanging chandeliers or low-hanging pendant lights can make the space feel cramped and present physical hazards. Opting for a low-profile, modern flush mount fixture keeps the dining zone open, ensures adequate headroom over the table, and provides comfortable illumination that enhances your dining experience.
Condo living in urban centers like Metro Manila often means maximizing multi-functional spaces where the dining area sits adjacent to the living room or kitchen. In these open-plan layouts, the visual impact of a ceiling fixture extends far beyond the dining table itself. A bulky or poorly positioned light can disrupt the visual flow of the entire unit, making the ceiling appear even lower than it is. By understanding how to evaluate physical proportions, optical performance, and electrical compatibility, you can select a fixture that serves as a stylish focal point while maintaining a spacious, uncluttered atmosphere.
Key Selection Criteria for Low-Ceiling Dining Areas
When dealing with limited vertical clearance, every centimeter counts. A standard dining table stands about 75 to 76 centimeters high. If your ceiling is 2.4 meters high, you have roughly 165 centimeters of clearance between the tabletop and the ceiling. To maintain an open feel and prevent tall guests from bumping into the fixture, look for flush mount lights with a profile thickness of 10 centimeters or less. This ultra-slim profile keeps the light source close to the ceiling plane, preserving valuable vertical space and preventing the dining area from feeling visually oppressive.
Products mentioned in this guide
Prices are valid at publication and may change. Please refer to the product page for the latest price.
Light distribution is another critical factor in low-ceiling environments. Direct, unshielded bulbs can cast harsh glare and create intense hot spots on a low ceiling, making the room feel smaller and visually uncomfortable. Prioritize fixtures that offer downward or diffused lighting patterns. Frosted diffusers or integrated LED panels scatter light evenly across the dining table, reducing shadows and preventing uncomfortable reflections off the ceiling surface. This creates a soft, inviting glow that is excellent for shared meals and long conversations.
Proportionate sizing ensures the fixture complements your dining table rather than overwhelming it. A general guideline is to choose a light fixture with a diameter that is approximately one-half to two-thirds the width of your dining table. For example, if your table is 90 centimeters wide, a fixture diameter between 45 and 60 centimeters is visually balanced. Additionally, consider the overall room footprint; a massive fixture in a compact condo dining alcove can make the entire living area feel disproportionately small, while an undersized light will fail to define the dining zone effectively.
The shape of your dining table should also influence the shape of your flush mount light. Round tables pair beautifully with circular disc fixtures, creating a harmonious, centralized focal point. Rectangular or oval tables, on the other hand, benefit from linear flush mounts or a series of small, aligned low-profile fixtures that distribute light evenly along the length of the tabletop. Matching these shapes helps define the dining zone within an open-concept condo layout, creating a sense of deliberate design and structure.
Modern Design Styles for Compact Dining Spaces
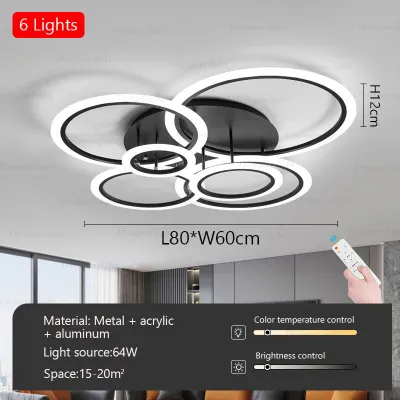
Minimalist geometric profiles are highly effective at integrating into modern, low-ceiling condo interiors. Flat disc designs, slim linear bars, and low-profile square fixtures sit flush against the ceiling, mimicking the look of recessed architectural lighting. These clean shapes draw minimal attention to the low ceiling height, allowing the eye to focus on the dining table and surrounding decor instead. By eliminating unnecessary ornamental details, minimalist fixtures maintain a clean, contemporary aesthetic that aligns well with modern interior design trends.

The choice of materials and finishes directly influences how heavy or light a fixture appears in a room. Matte metals, such as brushed aluminum, matte black, or satin brass, offer a contemporary look without adding unnecessary visual weight. Combining these metals with frosted glass or high-quality acrylic diffusers helps soften the light output, ensuring the dining area is well-lit without the harshness associated with exposed bulbs. These materials are also highly durable and easy to maintain, making them practical choices for busy condo households.
You can also use specific finishes to create visual illusions of height and space. Light-colored finishes, such as matte white or light wood accents, tend to blend seamlessly with standard white condo ceilings, making the fixture feel like an extension of the architecture. Alternatively, subtle metallic finishes can catch and reflect ambient light, adding a sense of depth and brightness to a compact dining alcove. When a fixture matches the ceiling color, its physical boundaries become less distinct, which visually elevates the entire room.
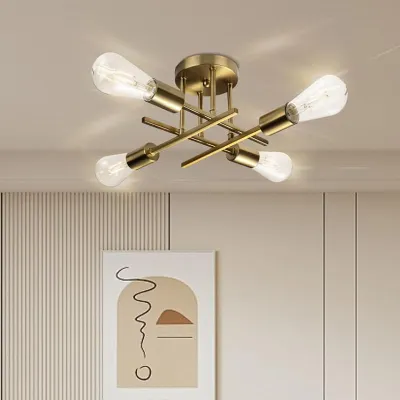
For those who prefer a touch of industrial or mid-century modern style, low-profile multi-arm flush mounts offer an excellent alternative to traditional chandeliers. These fixtures feature multiple short arms extending horizontally rather than vertically, spreading the light sources outward rather than downward. This horizontal orientation provides wide light coverage while keeping the fixture’s total height well within the safe limits for low ceilings. Opting for fixtures with adjustable arms allows you to customize the light direction to suit your specific dining table layout.
Technical Specifications and Safety Checks
Before purchasing any lighting fixture, you must verify its technical specifications to ensure compatibility with your condo’s electrical system. In the Philippines, the standard nominal voltage is 220V at 60Hz. Ensure the fixture you select is rated for this voltage to prevent premature driver failure or electrical hazards. Additionally, check the bulb interface type; standard E27 screw bases allow for easy bulb replacement, while integrated LED modules offer the slimmest profiles but require replacing the entire driver or fixture if the light fails.
Wattage and color temperature play a vital role in setting the right dining ambiance. For a cozy and inviting dining experience, look for fixtures that support warm white (2700K to 3000K) or neutral white (4000K) light. If possible, select dimmable options. Dimmable flush mounts allow you to transition the space from a bright, functional work area during the day to an intimate dining setting in the evening. Always verify that your wall dimmer switch is compatible with the specific LED driver in the fixture, as mismatched dimming systems can cause annoying flickering or buzzing.
Finally, assess the physical limits of your installation environment. Condo ceilings are often made of concrete slabs or suspended gypsum board. Verify the load-bearing capacity of your ceiling and the placement of the existing junction box. Suspended ceilings require proper anchoring to structural framing rather than just the plasterboard. Because many condo associations restrict structural modifications or drilling into concrete slabs, you must choose a fixture that matches the mounting pattern of your existing junction box.
In tropical climates like the Philippines, humidity and heat can affect the lifespan of electronic components. When selecting integrated LED flush mounts, pay close attention to the fixture’s heat dissipation design. Look for models with aluminum backplates or dedicated heat sinks that draw warmth away from the LED chips. Proper thermal management prevents the LEDs from dimming prematurely or failing during hot summer months, ensuring your investment lasts for years to come.
Building Your Shortlist: Where and How to Evaluate Options
When searching for the right fixture on online marketplaces or at local home improvement centers, use specific search filters to narrow down your options. Filter your searches by fixture height (selecting ‘flush mount’ and setting a maximum height of 10 to 12 centimeters), diameter, and modern design styles. This prevents you from wasting time browsing beautiful pendant lights or semi-flush fixtures that are physically unsuitable for your low-ceiling space. Utilizing these filters helps streamline your shopping process and keeps you focused on viable candidates.
Always cross-reference the actual dimensions and specifications on the product label or spec sheet rather than relying on promotional images. Online product photos are often digitally edited and can make a fixture look much larger or smaller than it actually is. Verify the exact diameter, height, weight, and lumen output. For a typical four-seater condo dining table, a light output of 1,200 to 1,800 lumens is generally sufficient to illuminate the tabletop comfortably without overpowering the surrounding living space.
Analyze customer reviews carefully to identify potential issues before making a purchase. Look for feedback regarding installation complexity, actual brightness, and heat dissipation. In the warm, humid climate of the Philippines, fixtures with poor heat dissipation can degrade LED components rapidly. Reviews that mention a fixture getting excessively hot or having a complicated mounting bracket can help you avoid unreliable products. Pay attention to photos uploaded by verified buyers, as these show how the light looks in real-world settings rather than stylized studio environments.
If you prefer shopping in physical showrooms, bring a tape measure and a checklist of your dining area’s dimensions. Seeing a fixture in person allows you to evaluate the quality of its materials, the sturdiness of its mounting bracket, and the actual color temperature of the light it emits. Ask the showroom staff to turn on the fixture so you can assess the diffusion pattern and check for any visible glare. This hands-on evaluation ensures that the fixture you choose meets both your aesthetic standards and your practical lighting needs.
Installation Boundaries and Professional Help
If you are replacing an existing ceiling fixture, you can perform a basic swap yourself provided you follow strict safety protocols. Always isolate the power at the main circuit breaker before touching any electrical wiring; do not rely solely on the wall switch. Use a voltage tester to confirm the wires are dead before proceeding. A straightforward DIY replacement is only safe when you are mounting a lightweight fixture onto an existing, compatible, and securely anchored junction box. Ensure you follow the manufacturer’s step-by-step instructions carefully during the process.
However, you must stop the installation immediately if you encounter any unexpected conditions. These stop conditions include finding degraded or outdated wiring, discovering a mismatched or damaged junction box, or realizing the new fixture requires drilling into a concrete ceiling slab without prior structural approval. Attempting to bypass these issues can lead to electrical fires, short circuits, or structural damage to your condo unit. It is never worth compromising your safety or your building’s integrity for a DIY project.
When encountering any of these stop conditions, or if you are uncomfortable working with electrical wiring, consult a certified electrician. Additionally, check with your condo’s property management office before scheduling any work. Many condominium buildings have strict guidelines regarding electrical modifications, permit requirements, and contractor access, making professional installation the safest and most compliant choice. A professional installer will ensure the fixture is mounted securely, wired correctly, and compliant with local electrical codes.
Frequently Asked Questions (FAQ)
Can I use a semi-flush mount light if my ceiling is very low?
Using a semi-flush mount light in an extremely low-ceiling room is generally not recommended. Semi-flush fixtures typically hang down 15 to 30 centimeters from the ceiling, creating a physical gap that can visually compress the space and pose a head-clearance hazard over the dining table. If your ceiling height is below 2.5 meters, it is best to stick to true flush mount fixtures that sit flat against the ceiling to maximize headroom and maintain an open, airy feel. If you must use a semi-flush model, ensure its total drop does not exceed 15 centimeters and that it is positioned directly over a permanent dining table where no one will walk under it.
How do I clean a flush mount light without damaging the ceiling?
To clean your flush mount light safely, first turn off the power at the wall switch and allow the fixture to cool completely. Use a dry, soft microfiber cloth or a static duster to gently wipe away dust from the exterior of the diffuser. For deeper cleaning, remove the acrylic or glass cover according to the manufacturer’s instructions and wipe it with a slightly damp cloth; never spray water or cleaning solutions directly onto the fixture or near the electrical components. Ensure all parts are completely dry before reassembling and turning the power back on. Avoid using abrasive pads or harsh chemical solvents, as these can scratch the diffuser or damage the metal finishes.

Community discussion
Share your experience or ask a question. Comments are reviewed before publication.